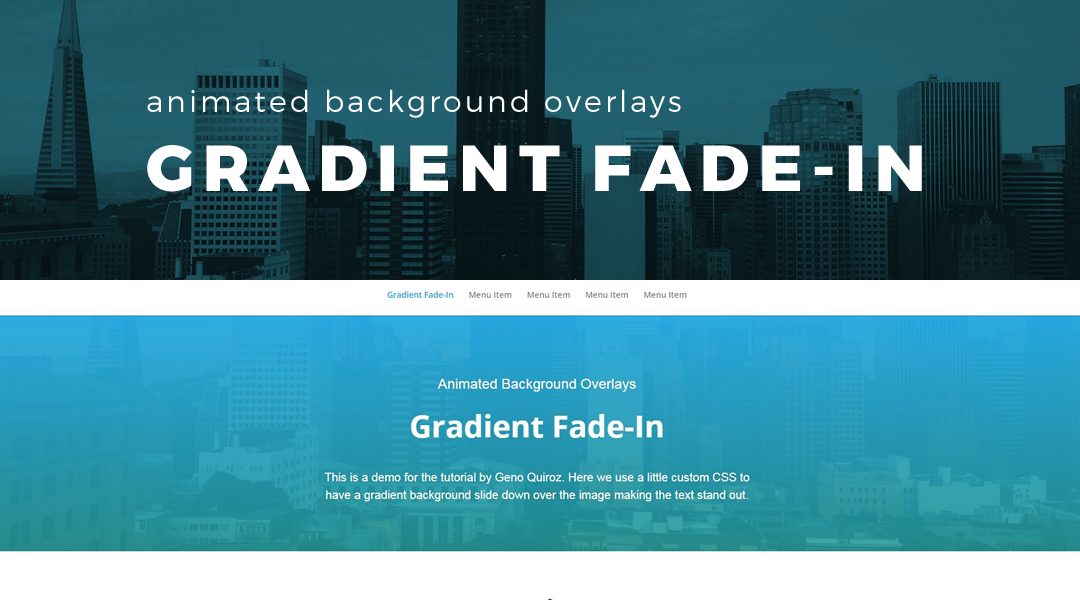
I have been getting a little bored with the same old page “hero header” section. I was looking for something that had a beautiful background image, clear text, and a wee bit of animation but not too much.
After a little experimenting I came up with a fresh header section that starts off with a crisp background image, and after a couple of seconds, a gradient background overlay fades in over the image and behind the text. You can achieve this type of effect using the new section settings but this is so much quicker to apply and modify for new projects without having to import and export layouts.
This is especially useful when you have used this hero section on multiple pages and the client asks you to adjust the colors or animation timing throughout the whole site 😉
In this tutorial, I will show you how we use a little custom CSS to have the gradient background overlay fade-in shortly after the page loads giving the page header section a crisp image, clear text and a tad bit of animation for that extra “pop.”
Let’s Get Started Setting up the standard Divi Section.
Adding the section and custom class
1. Create a single column section.

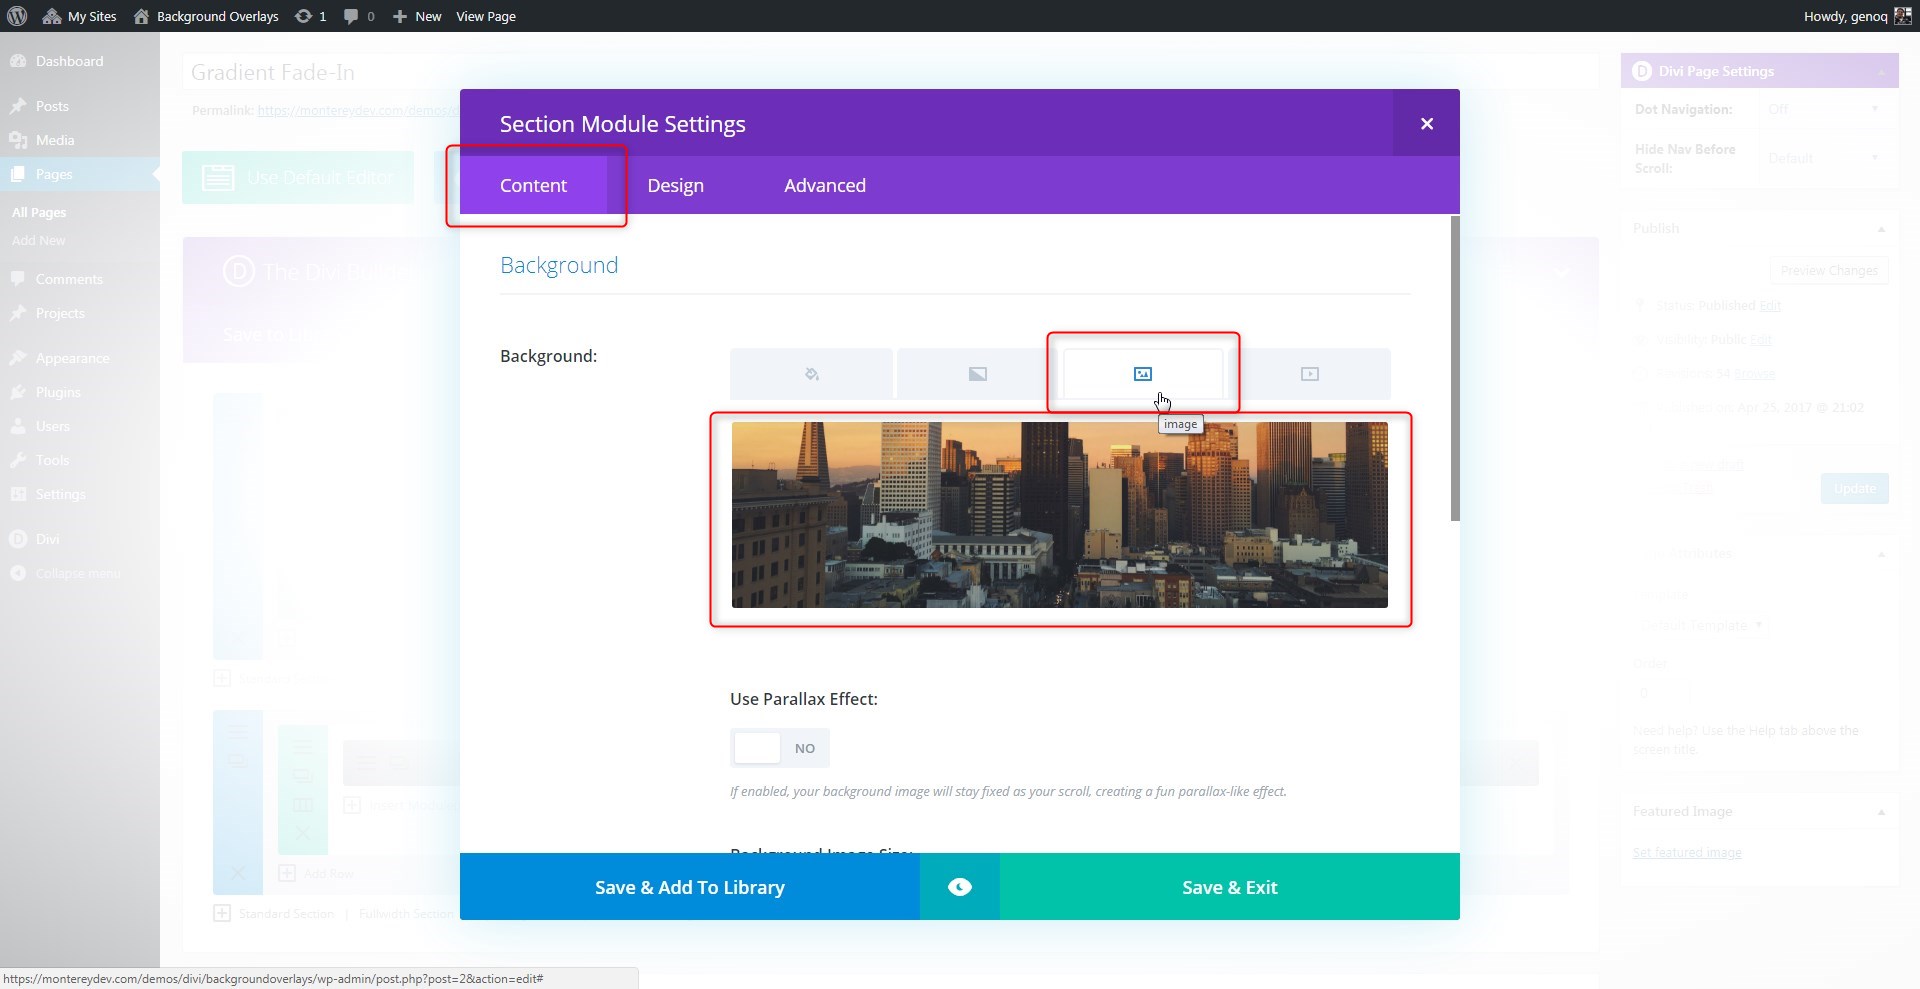
2. Open up the section settings, go to the “Advanced tab”, and add this custom CSS Class: gq_s_background_gradient

3. In the section settings, go to the Content tab, click on the Background Image tab, then add your background picture. (tip: background images should always be at least 1980px wide for optimum appeal)
4. Go ahead and add your text modules, button modules, or whatever you want in that hero section. In my demo I added three text modules. The first one I use for the preheader, one for the header and a third for the subheader. You can add whatever you want. Be sure to use light text. Even though it won’t be very legible at first, when the gradient fades in, it will be crisp and clear.

5. Save your page and move on to the magic of adding a little CSS.
Adding The Custom CSS
If you are working with a child theme you can go to Appearance>Editor and open your stylesheet. If not, go to Appearance>Divi Theme Options>Custom CSS (which is located at the bottom of the first tab in Theme Options)
Add this CSS.
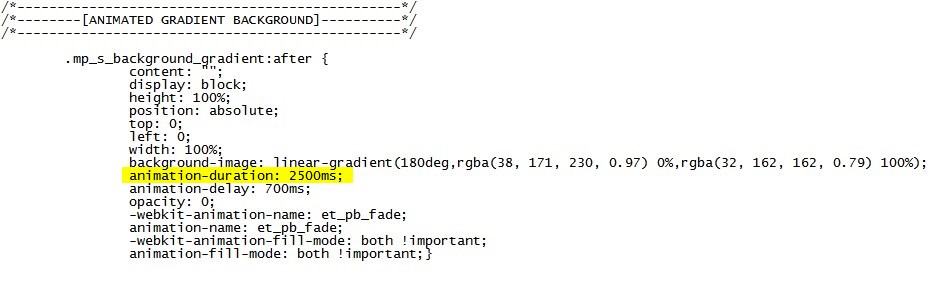
/*------------------------------------------------*/
/*--------[ANIMATED GRADIENT BACKGROUND]----------*/
/*------------------------------------------------*/

	.gq_s_background_gradient:after {
		content: "";
		display: block;
		height: 100%;
		position: absolute;
		top: 0;
		left: 0;
		width: 100%;
		background-image: linear-gradient(180deg,rgba(38, 171, 230, 0.97) 0%,rgba(32, 162, 162, 0.79) 100%);
		animation-duration: 2500ms;
		animation-delay: 700ms;
		opacity: 0;
		-webkit-animation-name: et_pb_fade;
		animation-name: et_pb_fade;
		-webkit-animation-fill-mode: both !important;
		animation-fill-mode: both !important;}
DIVI BONUS:
Initiate Animation When The Section Is In Viewport When Scrolling Up Or Down The Page
A fellow Divi user asked “Is there a way to delay the effect until the viewer has scrolled down to the part of the page where the section is? If I choose to put the section halfway down the page, for example.”
And the answer is yes! You just have to add a small jquery script to trigger the animation on both the up and down scroll–whereas by default it only triggers on page load.
1. First you need to grab this code and copy it to your clipboard
<script>
(function($) {
    var $animation_elements = $('.gq_s_background_gradient'),
        $window = $(window);

    function check_if_in_view() {
        var window_height = $window.height(),
            window_top_position = $window.scrollTop(),
            window_bottom_position = (window_top_position + window_height);

        $animation_elements.each(function() {
            var $element = $(this),
                element_height = $element.outerHeight(),
                element_top_position = $element.offset().top,
                element_bottom_position = (element_top_position + element_height);

            //check to see if this element is within viewport
            if ((element_bottom_position >= window_top_position) && (element_top_position <= window_bottom_position)) {
                $element.addClass('gq_s_background_gradient');
            } else {
                $element.removeClass('gq_s_background_gradient');
            }
        });
    }

    $window.on('scroll resize', check_if_in_view);
})(jQuery);
</script>
2. Now go to Divi Theme Options > Integration and paste the code into the section that says: Add code to the < body > (good for tracking codes such as google analytics)

And Thats It!!!
Making Adjustments To The CSS
As with all my tutorials, my goal is not to teach you how to use Divi Settings as much as it is to teach you how to customize your website learning a little CSS along the way. So with that being said, here are a few CSS tips to help you learn a little more about CSS.
To change the gradient color and transparency, you can do so here:

To change the speed of the gradient fade-in animation, you can do so here:
To change the delay before the animation begins, you can do so here:

And that’s it.
If you used this on one of your projects, please share a link below so we can see how you used it.
Have fun!
Well, that’s all for now. I hope you find this article useful.
![]()


Really very nice, thanks so much!
You are welcome Ahmed. Thanks for taking a few minutes to comment and let me know 🙂
This is perfect for my latest project! Already made a tip! 🙂
https://teatrotemp.purposeandpath.com – Still in development… Thank you Geno! 🙂
Awesome. That looks great. And thanks for the tip 🙂
It is so nice but unfortunately it is not working for me. The background goes white and during scroll it flashes, back and forth. 🙁
That’s strange. It might be conflicting with some settings you already have withing the section or module.
Amazing.
I had placed the css class in the row and not the section. My bad! Thank you for sharing a really fun effect!
This is pretty cool. I was wondering, does this work with video too?
I am trying to reproduce the effect Apple uses on it’s videos on the apple website. Specifically this one: https://www.apple.com/apple-watch-series-4/
It seems it has a delay, a non-looping video (which I know can be done in DIVI) Then the semi transparent overlay, with text.
You can probably achieve similar effects using this approach.