
The Pricing Table Module that comes with Divi is simply awesome. It does the work we would normally download a plug-in for. But WordPress developers know that less plug-ins make for a better performing and secure website. And there are so many ways to customize the pricing table using some custom CSS, that you really don’t need to consider the plug-in anymore.
So here are a few tweaks I came up with so that we would not need to install another plug-in for this.
The first thing I did was create the Section that I want to use this module in. If you are new to sections, you can check out this great tutorial by Elegant Themes right here.
Since I am going to use three tables, I am going to need some horizontal space so I am going to use One Column.

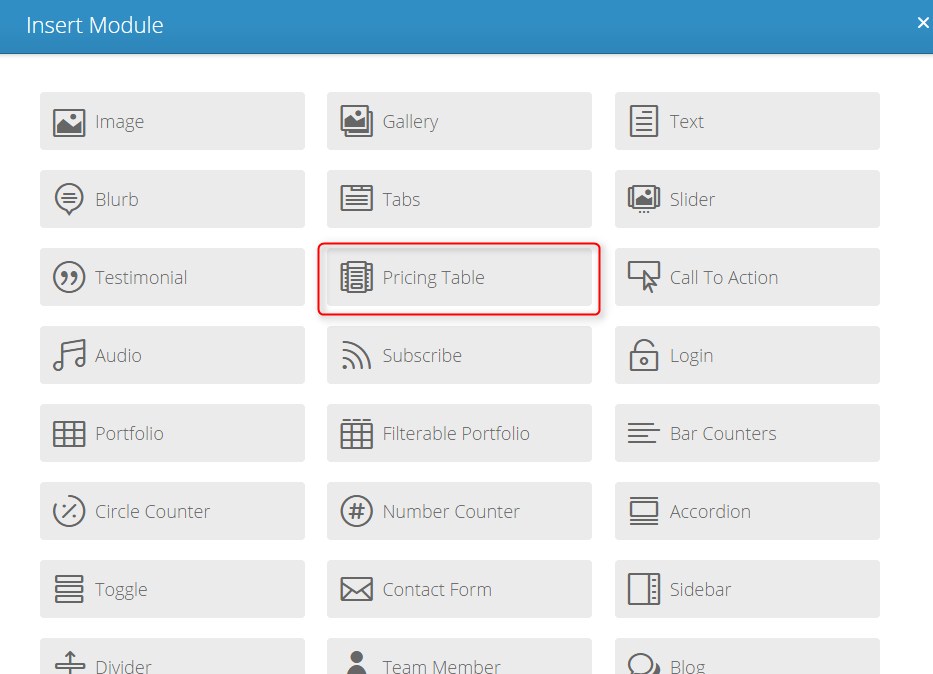
Now I am ready to insert my pricing table module.
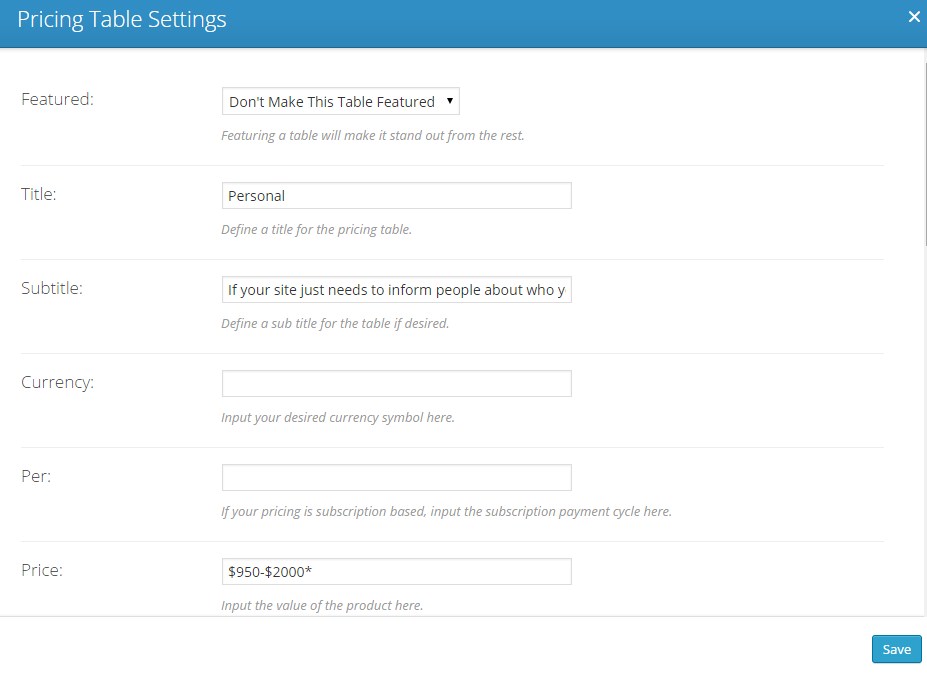
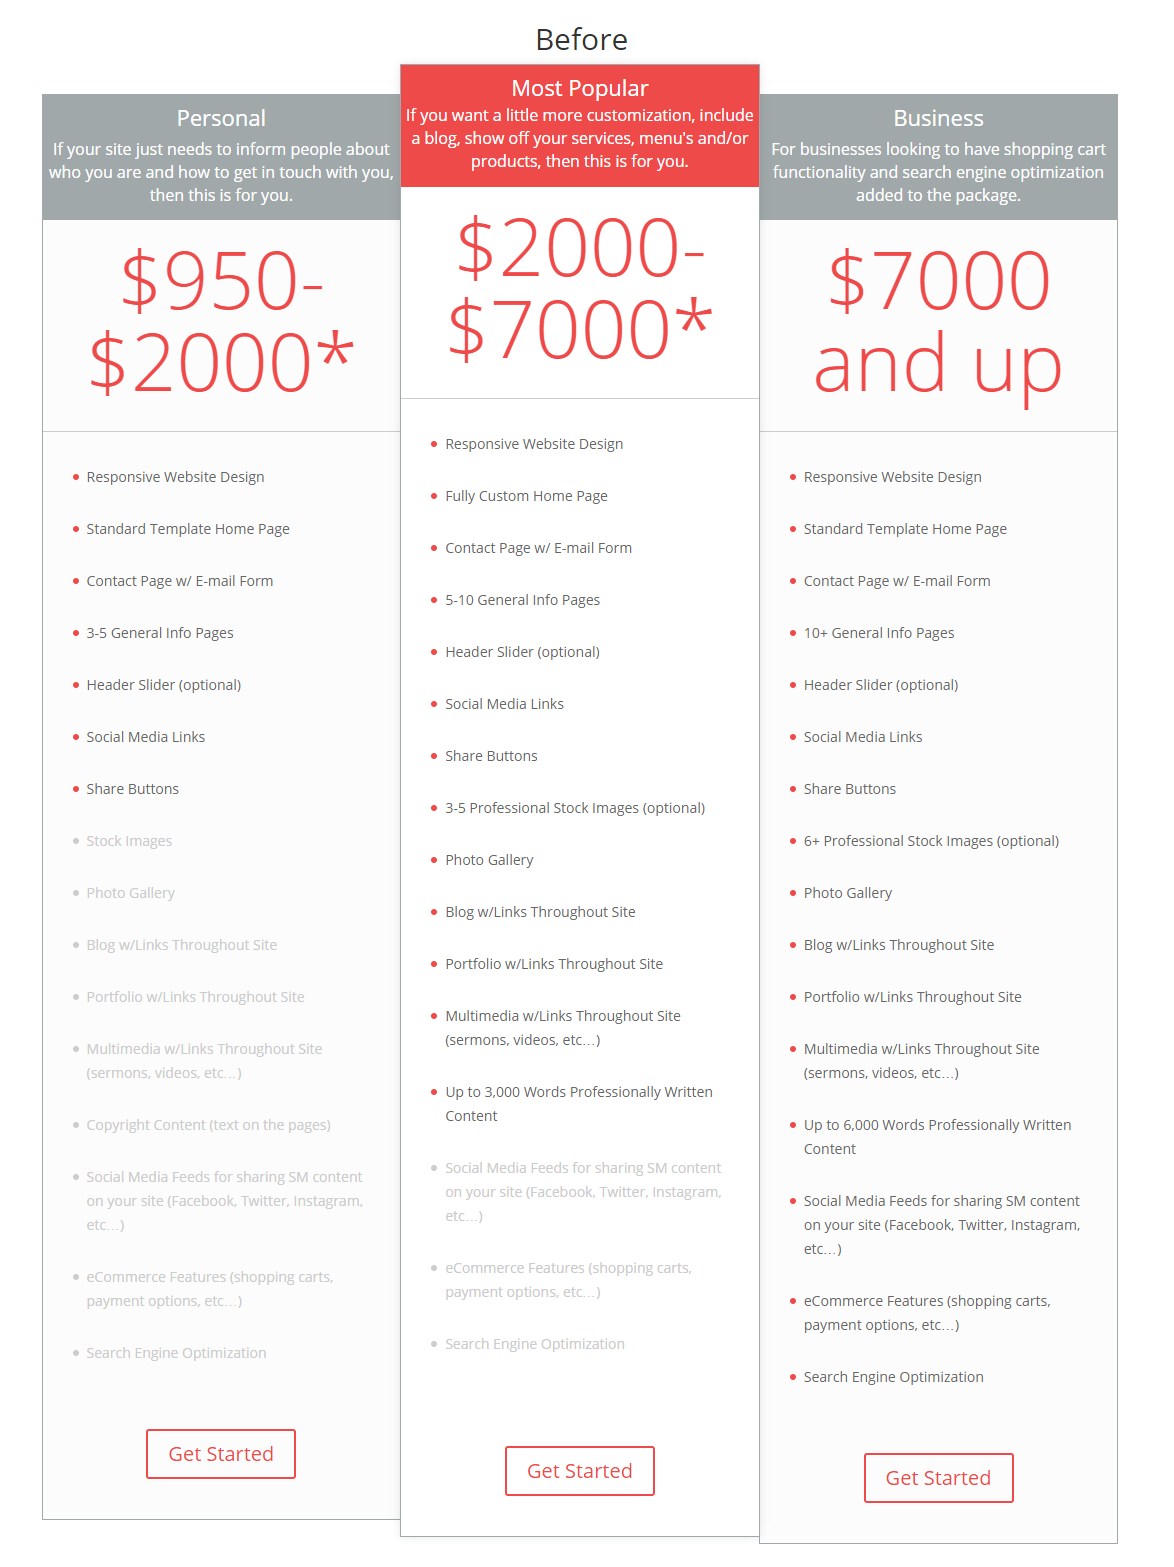
Now its time to create my tables. In my case I would like to use price ranges instead of a single price so I leave the “currency” and “per” fields blank . So my tables will look something like this.
And voila, you table will look something like this. But your colors may be a little different based on the color settings of your website.
Now lets just say you want to change it up a little. Change some colors, rounded corners, icons instead of bullets, font sizes (especially those ginormous price ranges).
Well that’s where the power of Divi’s custom classes and the magic of CSS comes in.
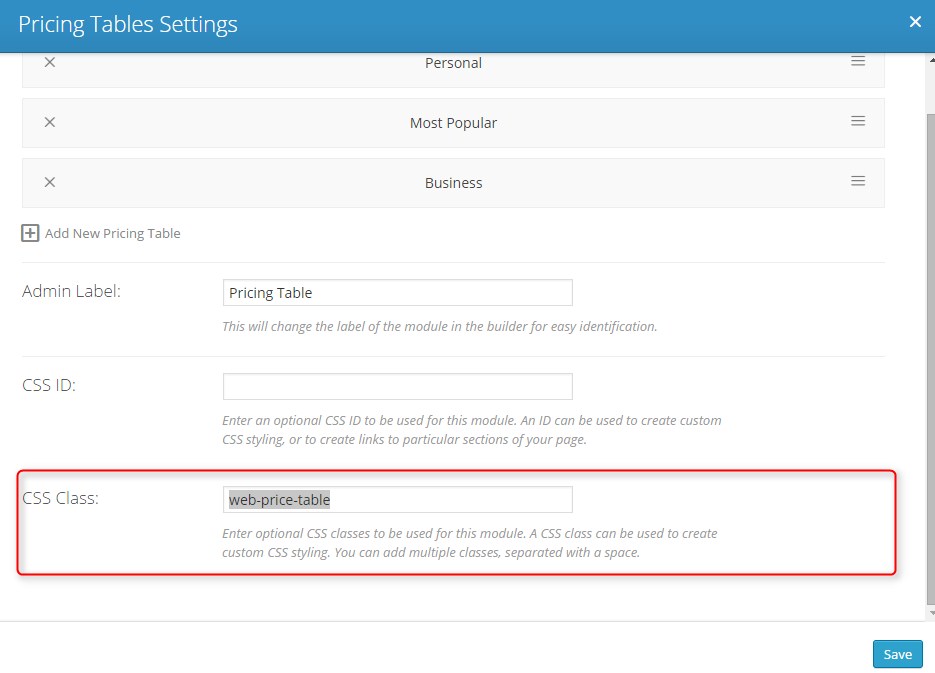
So the first thing I usually do is isolate this particular section so that my customization does not mess up any other areas of my site that might share some of the same code such as buttons, corners and bullets. To do this I open up the module and add a unique custom class.
In this case I added the following CSS class
.web-price-table
Great. Now lets start adding some STYLE! Simply add the following code to your Custom CSS box in your Divi ePanel or better yet, your child theme stylesheet.
Lets start by by changing up the heading text.
.web-price-table .et_pb_pricing_heading h2 {color: #fff; font-size: 22px; font-weight: 900;}
This little bit cleans up the text just below the heading text. Its going to modify the color, size, padding and weight of the text
.web-price-table .et_pb_best_value {color: #fff; font-size: 14px; display: block; padding: 5px 10px; font-weight: 500;}
Now lets change up that background color for those header boxes. The first element targets the regular columns and the second element targets the Featured Table. You can use whatever color you want by changing the #xxxxxx
.web-price-table .et_pb_pricing_heading {background-color: #1e73be;}
.web-price-table .et_pb_featured_table .et_pb_pricing_heading {background-color: #178624;}
Now its time to fix that ginourmous and crowded price range text.
.web-price-table .et_pb_sum {font-size: 30px;line-height: 0px;font-weight: 700;color: #4F545A !important;}
.web-price-table .et_pb_sum p {padding:10px 0px;}
.web-price-table .et_pb_pricing_content_top { border-bottom: 1px solid #ccc; padding: 8px;}
Almost there. I wanted my Most Popular Featured table to stand out a little so I gave it a little shadow to help it stand out above the others a little more.
.web-price-table .et_pb_featured_table {-webkit-box-shadow: 0px 0px 15px 5px rgba(157, 157, 160, 0.6); -moz-box-shadow: 0px 0px 15px 5px rgba(157, 157, 160, 0.6); box-shadow: 0px 0px 15px 5px rgba(157, 157, 160, 0.6);}
I also needed to tweak the spacing of each feature. Initially it was too much spacing the table was way too long. So this simple fix cut my column length down substantially
.web-price-table .et_pb_pricing li {line-height: 16px;padding: 0 0 15px 14px;position: relative;}
And now for the button
.web-price-table .et_pb_pricing_table_button {color: #fff !important; background: #1e73be;}
Now you are probably thinking thats a lot of work copying and pasting all those lines. Okay, I hear ya. If you just want to copy and past all the CSS above, here it is.
	.web-price-table .et_pb_pricing_heading h2 {color: #fff; font-size: 22px; font-weight: 900;}
	.web-price-table .et_pb_best_value {color: #fff; font-size: 14px; display: block; padding: 5px 10px; font-weight: 500;}
	.web-price-table .et_pb_pricing_heading {background-color: #1e73be;}
	.web-price-table .et_pb_featured_table .et_pb_pricing_heading {background-color: #178624;}
	.web-price-table .et_pb_sum {font-size: 30px;line-height: 0px;font-weight: 700;color: #4F545A !important;}
	.web-price-table .et_pb_sum p {padding:10px 0px;}
	.web-price-table .et_pb_pricing_content_top { border-bottom: 1px solid #ccc; padding: 8px;}
	.web-price-table .et_pb_featured_table {-webkit-box-shadow: 0px 0px 15px 5px rgba(157, 157, 160, 0.6); -moz-box-shadow: 0px 0px 15px 5px rgba(157, 157, 160, 0.6); box-shadow: 0px 0px 15px 5px
		rgba(157, 157, 160, 0.6);}
	.web-price-table .et_pb_pricing li {line-height: 16px;padding: 0 0 15px 14px;position: relative;}
	.web-price-table .et_pb_pricing_table_button {color: #fff !important; background: #1e73be;}
Well those are the basics. I broke it down because I wanted you to understand each element and how to specifically target each one. That way you can feel more confident making additional changes
Now lets have some fun. The bullets are boring. I wanted to add some green check marks and some red x’s. To do that I had to upload the little icons I would use.
The I added this code. You can replace the url below with the url path of your images.
/*Change Bullets*/

	.web-price-table .et_pb_pricing li:before {
		background-attachment: scroll;
		background-clip: border-box;
		background-color: rgba(0, 0, 0, 0);
		background-image: url("https://quiroz.co/wp-content/uploads/2014/09/green-plus.png");
		background-origin: padding-box;
		background-position: 0 0;
		background-repeat: no-repeat;
		background-size: 50% 50% !important;
		border: medium none transparent !important;
		color: transparent;
		height: 16px;
		margin-left: -1px;
		margin-top: -5px;
		width: 16px;}

	.web-price-table li.et_pb_not_available:before {
		background-attachment: scroll;
		background-clip: border-box;
		background-color: rgba(0, 0, 0, 0);
		background-image: url("https://quiroz.co/wp-content/uploads/2014/09/red-x.png");
		background-origin: padding-box;
		background-position: 0 0;
		background-repeat: no-repeat;
		background-size: 50% 50% !important;
		border: medium none transparent !important;
		color: transparent;
		height: 16px;
		margin-left: -1px;
		margin-top: -5px;
		width: 16px;}
Are we having fun yet? Lets also round the corners off a bit.
	/*Rounded Corners*/

	.web-price-table .et_pb_pricing_table:nth-child(odd){
	    -webkit-border-top-left-radius:6px;
	    -webkit-border-bottom-left-radius:6px;
	    -moz-border-radius-topleft:6px;
	    -moz-border-radius-bottomleft:6px;
	    border-top-left-radius:6px;
	    border-bottom-left-radius:6px;}

	.web-price-table .et_pb_pricing_table:nth-child(odd) .et_pb_pricing_heading{
	    -webkit-border-top-left-radius:4px;
	    -moz-border-radius-topleft:4px;
	    border-top-left-radius:4px;}

	.web-price-table .et_pb_pricing_table:nth-child(even){
	    -webkit-border-top-right-radius:6px;
	    -webkit-border-bottom-right-radius:6px;
	    -moz-border-radius-topright:6px;
	    -moz-border-radius-bottomright:6px;
	    border-top-right-radius:6px;
	    border-bottom-right-radius:6px;}

	.web-price-table .et_pb_pricing_table:nth-child(even) .et_pb_pricing_heading{
	    -webkit-border-top-right-radius:4px;
	    -moz-border-radius-topright:4px;
	    border-top-right-radius:4px;}

	.web-price-table .et_pb_pricing_table{
	    -webkit-border-radius:6px;
	    -moz-border-radius:6px;
	    border-radius:6px;}

	.web-price-table .et_pb_pricing_heading, .web-price-table .et_pb_tab_active:first-child{
	    -webkit-border-top-left-radius:4px;
	    -webkit-border-top-right-radius:4px;
	    -moz-border-radius-topleft:4px;
	    -moz-border-radius-topright:4px;
	    border-top-left-radius:4px;
	    border-top-right-radius:4px;}

	.web-price-table .et_pb_featured_table{
	    -webkit-border-radius:6px;
	    -moz-border-radius:6px;
	    border-radius:6px;}

	.web-price-table .et_pb_featured_table .et_pb_pricing_heading, .web-price-table .et_pb_tabs_controls, .web-price-table .et_pb_column_1_3 .et_pb_tab_active:first-child, .web-price-table .et_pb_column_1_4 .et_pb_tab_active:first-child {
	    -webkit-border-top-left-radius:4px;
	    -webkit-border-top-right-radius:4px;
	    -moz-border-radius-topleft:4px;
	    -moz-border-radius-topright:4px;
	    border-top-left-radius:4px;
	    border-top-right-radius:4px;}

	.web-price-table .et_pb_pricing_table:first-child {
	    -webkit-border-top-left-radius:6px;
	    -webkit-border-bottom-left-radius:6px;
	    -moz-border-radius-topleft:6px;
	    -moz-border-radius-bottomleft:6px;
	    border-top-left-radius:6px;
	    border-bottom-left-radius:6px;}

	.web-price-table .et_pb_pricing_table:first-child .et_pb_pricing_heading, .web-price-table .et_pb_tab_active:first-child{
	    -webkit-border-top-left-radius:4px;
	    -moz-border-radius-topleft:4px;
	    border-top-left-radius:4px;}

	.web-price-table .et_pb_pricing_table:last-child {
	    -webkit-border-top-right-radius:6px;
	    -webkit-border-bottom-right-radius:6px;
	    -moz-border-radius-topright:6px;
	    -moz-border-radius-bottomright:6px;
	    border-top-right-radius:6px;
	    border-bottom-right-radius:6px;}
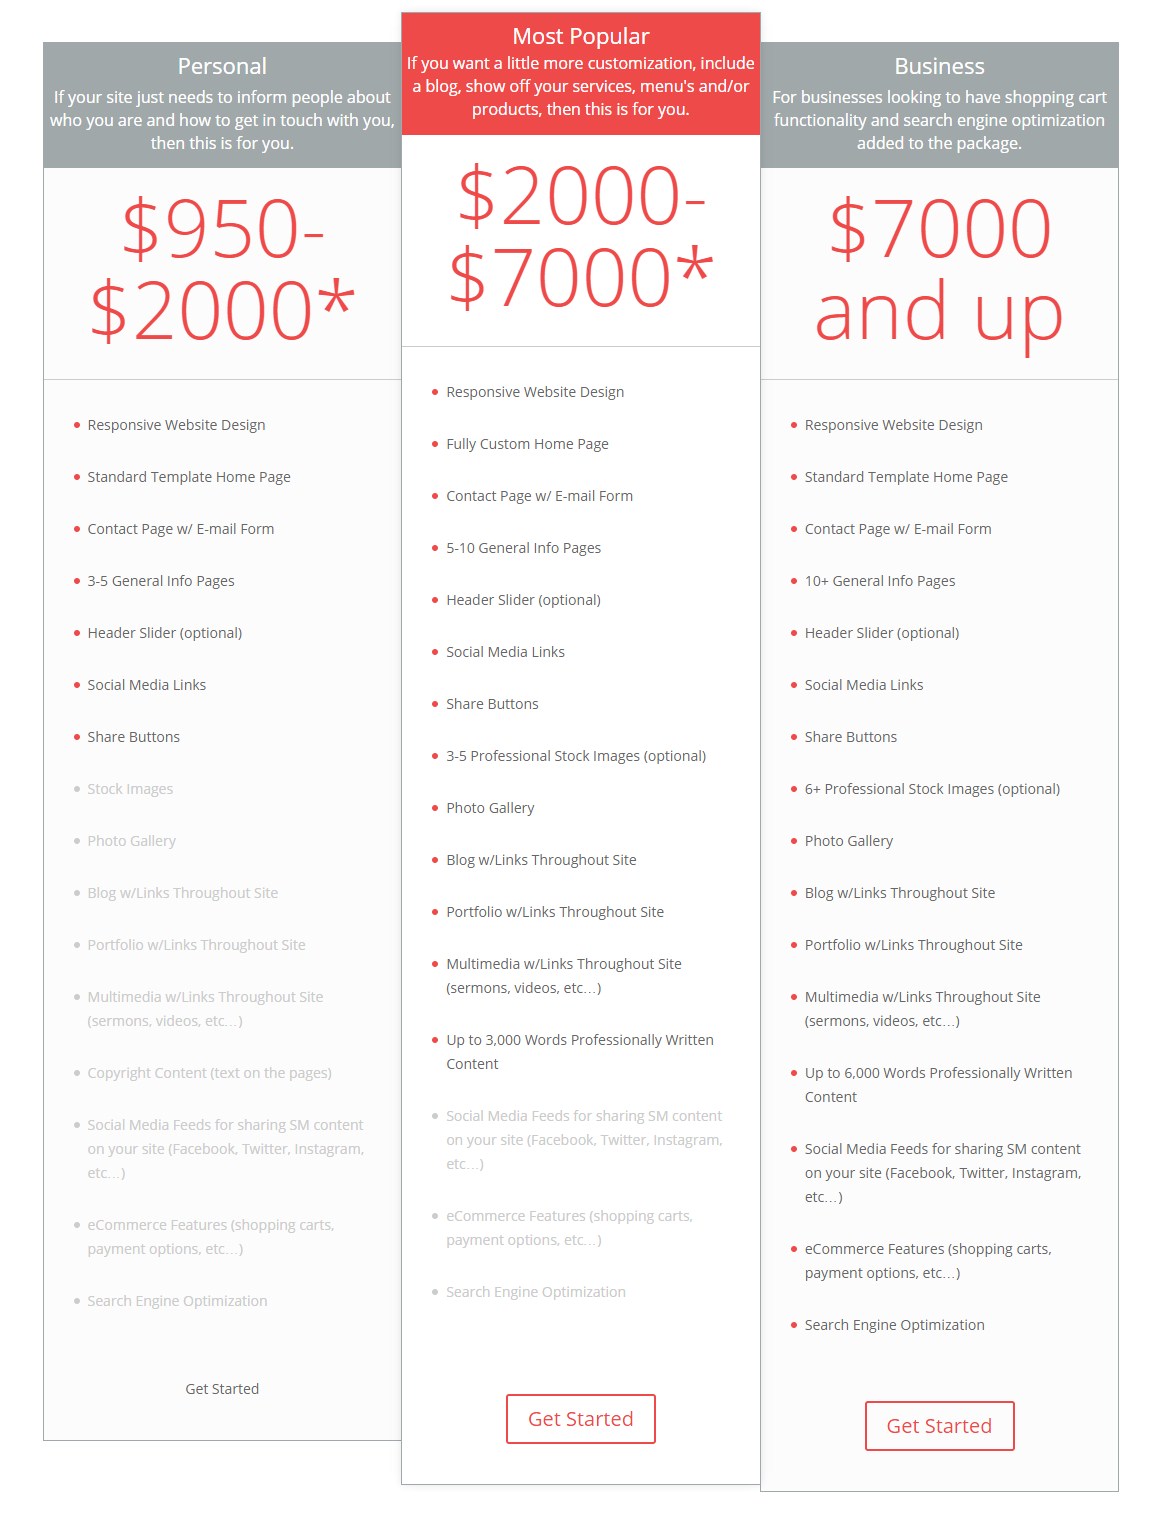
The end result? Tell me this is not the prettiest little pricing table you ever seen 🙂
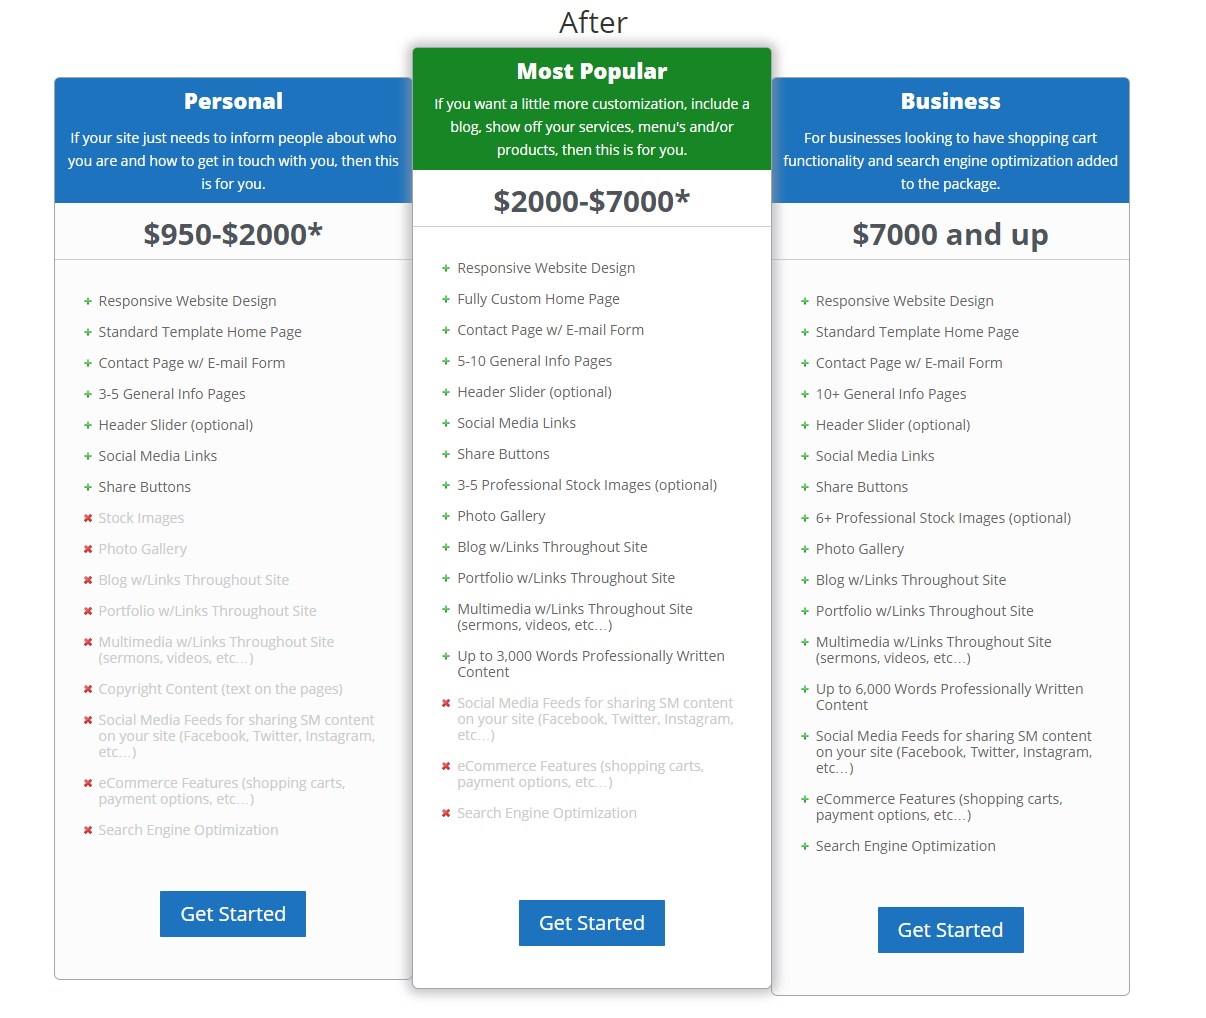
Okay, maybe not the prettiest but at least I had fun doing it 😉
You will need to replace the “.web-price-table” with the CSS Class you named that section.
Well that’s all for now. I hope you find this article useful.
![]()


Geno, this is an awesome post. Thanks so much for taking the time to put it together!
One thing… when I implemented it, the dollar signs kept the old style (small and grey and too high up). I added this to get it to look the way it does in your screenshot:
.web-price-table .et_pb_dollar_sign { font-size: 30px;line-height: 0px;font-weight: 700;color: #4F545A !important; top:0px; }
Note that most of this is the same as for .et_pb_sum, so the rules could be combined.
Thanks again, my friend!
Thanks Dan. The reason is because I leave the currency symbol field blank and include the currency symbol I wanted to use in the price field instead. Just like the image below. It was one less line of code 😉 Thanks for pointing this out though as I know this is a very useful bit of info and will come in handy.
Wonderful post !!!!
It has been really useful for me and for the other Divi theme user i think.
How insert the price in a circle ? do you think that’s possible ?
Thanks Frank. Can you send me a quick mock up or screenshot of what you are trying to accomplish. I will see what i can do.
Hey!
1st of all thank you for the good job, only wanted to say that i did all of the instructions and yet i see price tables the same way .. why is that ?
Hi There. One of the most common reasons this does not work for people is they did not change the css class for the Pricing Table Module. Did you open up your pricing table module settings and add this to the CSS Class?
web-price-table
It should look like this image…

If you made this change and it still does not work, send me the url of your page and I will take a look
– GQ
Hey Quiroz,
why following all of your instructions i keep seeing the same pred. Pricing table :S ? nothing actually changed
Hi There. One of the most common reasons this does not work for people is they did not change the css class for the Pricing Table Module. Did you open up your pricing table module settings and add this to the CSS Class?
web-price-table
It should look like this image…

If you made this change and it still does not work, send me the url of your page and I will take a look
– GQ
wow thank you very much ^^ the problem is i put “.web-price-table” and not “web-price-table” carefull with that point 😛 ! thank you ^^
Is there anyway i can put each pricing table of one color ? for example i have 3 comparatives in the same table, 1 red color the other one blue and the recomended in green ?
Use this to target the first column and make it red as you suggested…
.web-price-table .et_pb_pricing_table:first-child .et_pb_pricing_heading {background-color: #F00 !important;}
Let me know if worked.
Awesome. Thanks for letting me know the outcome.
Hey quiroz it worked awesomly so now if i want the second column to another color i should put this :
.web-price-table .et_pb_pricing_table:second-child .et_pb_pricing_heading {background-color: #F00 !important;}
No. In my demo the second column is the featured column and that specific column is targeted using the “featured” code I have in the tutorial. Are you using the featured column feature to highlight your “Suggested” pricing?
But if you want to change the last column color you can use .web-price-table .et_pb_pricing_table:last-child {background: #000;}
If you want to learn more about first, last and nth targeting, you can read more about it here… http://blog.calcatraz.com/customizing-the-divi-wordpress-theme-2020#Apply_a_Style_to_a_Single_Text_Module
Hey Quiroz
Do you think there is anyway to do a comparative table with any tools of divi ? something like this
http://gyazo.com/6c581eb9ffda99a890d49f5686444aaa
Not that I know of. I would recommend finding a plug-in for that one.
Hi Geno,
I would like to do some more customization in pricing table. I would like to add a “More” link after the Button, when i click on that i need to expand the same table down and shows the rest of the details. Could you please advise me or please give me files which are handling pricing table details. So that i can edit the php code to accommodate this?
If you open up the functions.php file and do a search using the word “pricing” you will find all the php used for the pricing table module. You will have to do a little investigating as to which section to modify. Unfortunately I have not explored this particular function and am not sure which section you would add your custom changes to.
Hi Geno,
I have child theme for DIVI .. I found some modules for pricing, but i am not sure how to override the functions in child theme.. Could you please help me?
I will post it if I find a solution for you.
Thanks for this post, it saved me a lot of time and headache!
Hope to see more post like this, as I believe that there are a lot of divi users out there 🙂
Thanks for stopping by Tim!!! I plan on doing more.
I can’t seem to get the bullet change code to work but everything else is working. The table is on this page at the very bottom: http://www.bookmoreweddingsacademy.com/?page_id=1522&preview=1&_ppp=84cc6b6a8d
Not sure why it’s not working for you. as you can see on the image below, it worked just fine when I plugged in the code on your site. You might have some code elsewhere on the site that is overriding this or just make sure you have all the correct semantics.
Hi Geno – I got everything to work except for the bullets which have remained the same for some reason.
Just sent you an email.
Fixed. All I did was remove what you copied over and re-copied and pasted directly from the tutorial and it worked for me. Must have been a minor change in something after you originally copied it over. Let me know if there is anything else I could do to help
Great stuff! Do you know how we can make the pricing module smaller. I like the layout we have but feel it would look better 30% smaller. Any advice would be appreciated!
Hi Fred. I am glad you like the tutorial. I think if you were to remove all (or most of) the padding throughout the table it would come close to shrinking it down by 30%.
Excellent post Geno, thanks very much, my clients pricing table looks a lot more funky!!
http://www.suziesuescreamteas.co.uk/tea-party-menus/
Great job on that menu Stuart. In fact the whole website is very clean and beautiful. A great Divi example. Thanks for sharing.
Hi Geno
I’m just about to add pricing tables to a Divi site, so where do I look for advice?
I came straight over to check out your “pretty up the pricing tables” CSS and I’m not disappointed.
Appreciate all the hard work you put into this one and thanks for sharing.
Many thanks.
Thanks Keith!
HI,
Thanks so much for posting this & look forward to more.
Mike
Awesome. Glad to help. Thanks for swinging by to check out the site 🙂
Hi again,
It works beautifully – except when I save it as it’s own layout. For some reason that puts an empty line at the top of the list of items included in each module. An absolute bind.
Any thoughts?
Mike
Hey Mike. Im not sure. Can you post a link so that I can take a look?
Hi,
Sorry been so busy! I saved the standard pricing table as it’s own layout so that I can add it in whenever I need to. When I do add it & then move the standard pricing table into any other section to another section then the pricing table adds new lines and the formatting goes helter skelter. Odd.
Can I ask something different?
Earlier wpmanwas asking about putting colours in the first column – the code was
.web-price-table .et_pb_pricing_table:first-child .et_pb_pricing_heading {background-color: #F00 !important;}
If I have three columns and I want three different colours would the code look something like
.web-price-table .et_pb_pricing_table:first-child .et_pb_pricing_heading {background-color: #FFD700 !important;}
.web-price-table .et_pb_pricing_table:last-child .et_pb_pricing_heading {background: #cd7f32;}
.web-price-table .et_pb_pricing_table:middle-child .et_pb_pricing_heading {background: #c0c0c0;}
http://dorsetphotoboothhire.co.uk/wedding-photo-booth-hire-dorset/blandford-photo-booth-hire/
It’s almost there but the middle-child stubbornly remains green. None of the columns are featured.
Many thanks
Just replace this…
.web-price-table .et_pb_pricing_heading {
  background-color: #227c6e;}
with this
.web-price-table .et_pb_pricing_heading { background: #cc3902;}You rock! Many thanks.
That rocks! Thanks for the detail. Can you tell me how to put text BELOW the sign up button?
Sorry Seth. I have not tried that one yet.
your Demo looks the same on Before and After.
Sorry about that. I updated some pages on my site recently and removed that css temporarily. Its working again. Thanks for the heads up. 🙂
Appreciated, Thanks for helping while creating pricing table in divi theme.
Anytime. Thanks for checking out the blog Usman 🙂
Hi there! Thank you very much for that! Worked all fine. but a lil Question. How i can remove the thin border which divides the price from the content?
http://gyazo.com/3b6b8a6b6b1b98cbaa88a2d13fe1bb93
.web-price-table .et_pb_pricing_content_top { border-bottom: 0px solid #ccc;}Awesome, thank you so much! That fixed it 😀
Thank very helpfull info, save me a lot of time for the people asking for the dollar sing add
.web-price-table .et_pb_dollar_sign { font-size: 18px; font-weight: 400; position: relative; top: 0; color: #4F545A !important; padding-right: 8px;}
Thanks for the share Lester 🙂
Thanks! I was browsing the net for a while but there are not many articles (like 2) about How to customize Divi’s Pricing Tables. Thank you for making this one and breaking it into easy pieces for newbies like me. Very important to notice that within the price table settings in the builder you add CSS Class web-price-table WITHOUT the dot before and in the epanel .web-price-table with the dot. Even though you did mention it in your article it took me a while to figure it out. Easy to miss.
Thanks for sharing Anette 🙂
Hi Geno. Thanks a lot. You did a great job. Can you help me with how i can set up not available itens in my price table?
You mean like I have in my pricing table where the not available items are styled differently?
Yes. Exactly like that.
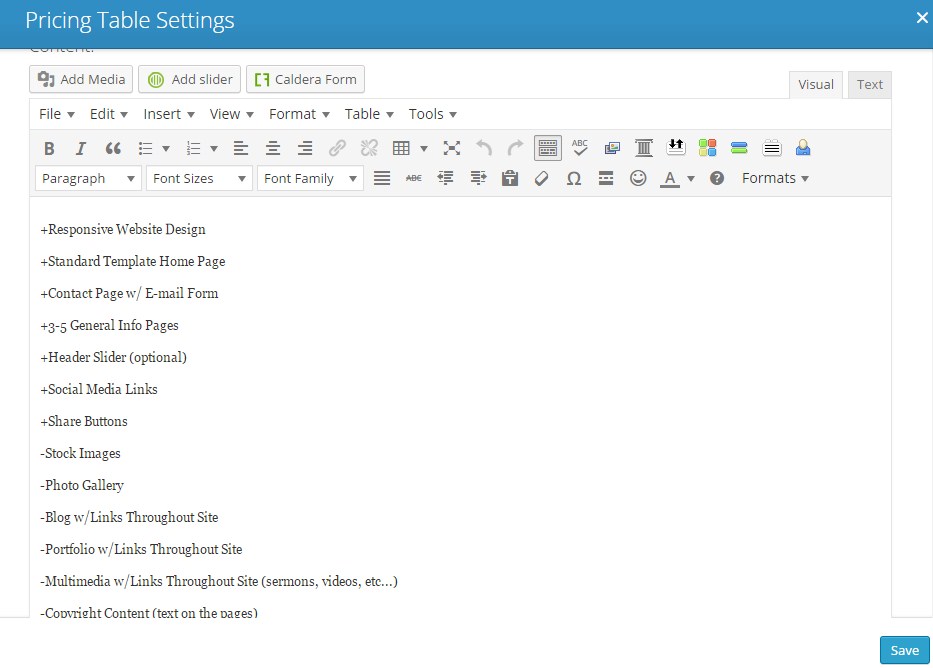
Cool. On one of the images towards the beginning of this post, you can see an example of how I added a + or – before each item. Thats all you have to do.
Hey Geno. Thanks so much for laying this out. It works beautifully – as always! I’m actually using a pricing table to show a daily agenda for a 3-day event, with the featured table being the Register Now button with price.
I’m wondering if there an easy way via CSS to make all the table columns the same height as the longest column? Our 2nd day agenda items (or features) is much longer than the 1st and 3rd day so it looks really wonky. Even if the 1st & 3rd day’s column has blank space that’d be ok as long as all the columns are the same height (the shorter Featured table is fine).
Super easy. Just change the display to table for the columns. Here’s the CSS:
MAIN TABLE
.et_pb_pricing {

    display: table;

}
COLUMNS
 .et_pb_pricing_table {

        display: table-cell;

        float: none;

}
I used this but nothing changed. I wound up needing to add !important to one of the elements… float:none !important;
Hello! Great post. I’m looking for a way to get rid of the “content” box in the pricing table. My client only wants to show the title and the price of each service he offers, and that’s it. Is there a way to do this? Thanks!
I will have to look into this when I get chance. 🙂
Thank you!
This post is gold. Thank you so much
Do you know a way I can remove the bullet from just one menu item? So I can use it like a header sort of. I’m using the pricing table to compare our competitor’s product to ours. http://www.tabpilot.com/compare/
Sorry for so many comments. I need to proof read better. I meant to say “list items” not “menu items”
I will look into this one when I get some time 🙂
On 2.4.51 not works at all
Hello guys, the look and feel is awesome. Did anybody tested it on 2.4.6? After such a big upgrade I just wanted to be sure it will continue working. Thanks!!
Hi Marcelo. This has not been updated for 2.4.6 yet. But we will have something soon 🙂
How would you use this to change the width of the columns in the pricing table?
Try adding this to your epanel and change the width %
.et_pb_column_4_4 .et_pb_pricing_3 .et_pb_pricing_table {width: 33.33%;}Hey Geno! Thanks for the tutorial.
One thing im not sure how is done is to make a margin (gap) between the colums?
Thanks in advance!
Philip
He Geno, How can one reduce the space between the divider line and Button “Get Started”?
Shoot me a link.
Here is the link where I do my test before I apply it on main page.
http://ihoustonlimo.com/sample-page/
I need to reduce the space for button row. Space between the divided and bottom line. I tried to include screenshot but I couldn’t.
This reduces all the padding in the area. You can increase the padding as needed.
.et_pb_featured_table .et_pb_pricing_content {padding-bottom: 0px;} .et_pb_pricing_content {padding: 0px;} .et_pb_pricing_table.et_pb_featured_table {padding-bottom: 0px;}Thanks Geno. It works. You are the best 🙂
This has helped me tremendously! Thank you so much! For some reason though I can’t get the bullets to be images and the buttons are missing -the Join Me text is there just no button around it… Can you take a look please? http://kathypetersen.com/coaching/membership-levels/
Geno, as always great advice! I too am however having an issue with the bullets not changing. I’ve copied your code but the bullets haven’t changed.
I’ve renamed my CSS class to features-table
.features-table .et_pb_pricing li:before {
background-attachment: scroll;
background-clip: border-box;
background-color: rgba(0, 0, 0, 0);
background-image: url(“http://spendlogic.com/wp/wp-content/uploads/2016/01/tick.png”);
background-origin: padding-box;
background-position: 0 0;
background-repeat: no-repeat;
background-size: 50% 50% !important;
border: medium none transparent !important;
color: transparent;
height: 16px;
margin-left: -1px;
margin-top: -5px;
width: 16px;}
.features-table li.et_pb_not_available:before {
background-attachment: scroll;
background-clip: border-box;
background-color: rgba(0, 0, 0, 0);
background-image: url(“http://spendlogic.com/wp/wp-content/uploads/2016/01/cross.png”);
background-origin: padding-box;
background-position: 0 0;
background-repeat: no-repeat;
background-size: 50% 50% !important;
border: medium none transparent !important;
color: transparent;
height: 16px;
margin-left: -1px;
margin-top: -5px;
width: 16px; }
But this hasn’t changed http://www.spendlogic.com/features
I have the same problem, any solution?
Found the solution. Replace:
.web-price-table li.et_pb_not_available:before {
With:
.web-price-table li.et_pb_not_available span:before {
AND
.web-price-table .et_pb_pricing li:before {
WITH:
.web-price-table .et_pb_pricing li span:before {
Nice! Thanks for sharing the solution 🙂
Yes this trick works.
I used your information here (great lesson btw) to get my pricing table looking how I wanted it. Then today I saw that there was an update to v2.7 for the Divi them and I did the update. That messed up my pricing table a bit and I can’t figure out what to do to fix it. I have 6 pricing tables. Originally it was showing up as 4 columns then 2 underneathe, left justified. I used this CSS code to shrink the width which put all 6 prices in one row.
.et_pb_column_4_4 .et_pb_pricing_6 .et_pb_pricing_table {width: 16.22%;
}
Then I played with the percentage until it was just right to fill the width of the page without wrapping anything. The problem now is that I’m back to having 4 columns on top and 2 on the bottom and it doesn’t matter how much I change that percentage. Any ideas?
Try adding !important
.et_pb_column_4_4 .et_pb_pricing_6 .et_pb_pricing_table {width: 16.22%!important;}I posted a ticket in the Divi forum yesterday, too, and got a reply before I saw your reply, Geno. They told me to add this code…
.et_pb_column_4_4 > .et_pb_pricing > .et_pb_pricing_table:nth-child(4n+1) {
clear: none!important;
margin-top: 30px !important;
}
That explains why I couldn’t figure it out! 🙂 I did have to leave the other code in there, too. Now all 6 columns are back on one row but the last one is shifted down about 20 pixels. I did try adding !important to the previous line of code but that didn’t change anything. Version 2.7 must have had some major changes.
Just got another reply on my ticket already. Different guy said to add this code (not replace anything with it).
.et_pb_column_4_4 .et_pb_pricing_table:nth-child(6) {
margin-top: 30px !important;
}
And that worked. Posting all this here for you and anyone else who might benefit from it here.
Hi Geno, thanks for the great article
I would like to target a single pricing table in the same row and I have used your link posted above , but the link doesn’t work.
could you please confirm the link .
http://blog.calcatraz.com/customizing-the-divi-wordpress-theme-2020#Apply_a_Style_to_a_Single_Text_Module
Regards
Hi Geno. Thanks for the great article. It helped me tweak my pricing table. I changed the width % but for whatever reason I can’t get the whole pricing table to center to the page now no matter what I’ve tried. Suggestions?
It’s hard to say what you might need to do without seeing. Can you share the link to your site?
Hi Jerry, Unfortunately I can’t. I’m working on my site on localhost right now 🙁
Hi Geno
Thanks for such a good article. Its really helping me do a nice pricing table for a client. Is there a way I can move the pricing to the bottom instead of keeping it on top. Thank You.
I do not think that can be done with the standard Divi pricing table. For that you would need to setup and style your own custom table.
Hi Jerry, Thank You. Is there a way I can remove the pricing from one of the bullet item, then I will just move the price on the bottom without a bullet item. ? Thank You.
I think I understand what you are asking…to remove the price from the top altogether. Right? If you are using the code from this tutorial, you can do that by adding this to the CSS…
.web-price-table .et_pb_pricing_content_top { display: none; }Great that works real nice. Thanks Jerry. If I could now remove the bullet from just one item then I would be all set. I could put the price on the bottom without a bullet. Is that even possible?. You guys rock.
You are welcome Girish. I was able to work out the CSS to remove the last bullet, give this a shot and let me know how it goes…
.web-price-table .et_pb_pricing li:last-child span:before { display:none; }Hi Jerry, Okay I dont see a Reply button for the previous Reply that you made, so replying in a new comment. But that worked great. The last item now does not have a bullet. Thanks a lot. You are a genius.
Hi Geno.
I need help on making a pricing table with a custom divider below the price and details. Like this: http://www.honeybaylembeh.com/wp-content/uploads/2016/10/room-rates-stp-details.png
Thanks.
That is a good looking pricing table. To do something similar with the pricing table module would require more time than we can give you right now.
You might want to try to do this using a Standard Section with a couple Three Column Rows. You could use a Text Module to achieve the green background header, an Image for the divider and icon, another Text Module for the features, and then a Button. Then adjust the margins to push it all together.
Geno, thank you very much for the Fantastic Tutorial! Very easy to follow and implement! ALL YOUR TUTORIALS ARE GREAT!!!
Nice work, been looking for something like this.
Hi Geno, thanks for the great article.
I cannot seem to get the bullets to update with my symbols. i have changed the url to my symbols but it still doesn’t work.
SomeCould you add some balloon/icon as an offer?
Not sure what you mean.
Hi Geno, thanks for the tutorial. I only want to change the individual colors of the table headers + their matching buttons. I think Im doing something wrong because no matter what I add, nothing changes.
On the main pricing table module “Advanced” settings I added:
web-price-table
to the CSS Class. Then, in the same main pricing table module (NOT the individual tables’ advanced module settings), I added:
.web-price-table .et_pb_pricing_table:first-child .et_pb_pricing_heading {background-color: #29d0b4 !important;}
.web-price-table .et_pb_pricing_table:last-child .et_pb_pricing_heading {background-color: #ff8c4b !important;}
.web-price-table .et_pb_featured_table .et_pb_pricing_heading {background-color: #2eaef2;}
.web-price-table .et_pb_pricing_table_button:first-child {color: #fff !important; background: #29d0b4;}
.web-price-table .et_pb_pricing_table_button:last-child {color: #fff !important; background: #ff8c4b;}
.web-price-table .et_pb_featured_table_button {color: #fff !important; background: #2eaef2;}
…the problem Im having is WHERE to add that code in the Main Module’s CSS Advanced Setting area. Divi now has distinct CSS boxes for each feature of the pricing table, namely:
Before
Main Element
After
Pricing Heading
Pricing Title
Pricing Subtitle
Pricing Top
Price
Currency
Frequency
Pricing Content
Pricing Item
Excluded Item
Pricing Button
Featured Table
I tried adding all the CSS to the “Main Element” box, that didnt work. Then, I tried adding the table CSS to the “Pricing Heading” section and the button CSS to the “Pricing Button” section and the featured table CSS to the “Featured Table” section and a few other combinations. Nothing worked. No changes.
Then, I wondered if I need to add the specific CSS coding to EACH of the 3 column/table’s individual CSS Advanced option sections, rather than the main module’s advanced CSS section.
Im really at a loss. Please help me out, if you can. I dont know what Im doing wrong.
This CSS was written for a stylesheet and not for the modules.
Oh, and Im pretty sure I did something wrong in the CSS coding. I tried to adapt it from some other comments, but it seems like I made a mistake somewhere. Thanks for your help.
Unfortunately this breaks all the responsive features and doesn’t wrap each column on smaller screens.
Thank you for that fix!
You bet.
Really appreciate your help. I am unable to get the green and red icons to display. I can’t seem to find whatever the conflict may be. Please advise. Many thanks.
Hello, for some reason I’m having trouble formatting the tables on mobile. I’m only making two columns, and would like them side by side, but they go on top of one another instead. Any ideas? Thanks!
That is the Divi default. You would have to force the columns to have a width of 50% on mobile instead of 100%. Shoot me a link.
Great post!
I know the name is pricing table, but I’d like to hide the price in the table, including the area where they show up. I’d like to use it as a comparison table, and since there’s no comparison module in Divi (as far as I know). What CSS should I add? Just leaving empty the pricing info. doesn’t remove the area where the price should go. I’m using the Divi Builder in a different theme.
Thanks
Add this.
.et_pb_pricing_content_top { display: none; }this can be achieved combining width and margin. Add this to the epanel:(divi-dive theme options-general-custom css):
.et_pb_column_4_4 .et_pb_pricing_3 .et_pb_pricing_table {margin: 15px;width: 30%;}
We are having issues with our pricing table with the link below https://www.dtapclinic.com/hiv/hiv-testing/ and its not mobile responsive. Please have a look this link with mobile devices
We are looking for some solution if there is any possibility to fix this on mobile devices. We are using wordpress by the way. Looking forward to the suggestions.
Thanks.
Hi Kristine. Unfortunately this site is not using Divi so I am unsure how to fix your issue.
I have been combing the net looking for an eye-catching pricing table until I was almost about to give up luckily I stumbled upon this your marvelous post.
I have one problem though, I don’t know whether there is any pricing table that is collapsible, when the items are too many it becomes boring scrolling from bottom to top.
I will be more than happen if you could help introduce one to me.
Thanks
Thanks Ava. Unfortunately I have not attempted to make a pricing table collapsable yet.