There are a number of great plugins that allow you to create some very elegant image overlays and hover effects. Two very popular Divi plugins include Image Intense by BeSuperfly and Divi Overlays by DiviLife.
On a recent project, the hover overlay requirement was pretty basic and we needed a solution that did not require the use of a plugin as this would be used in other websites as well.
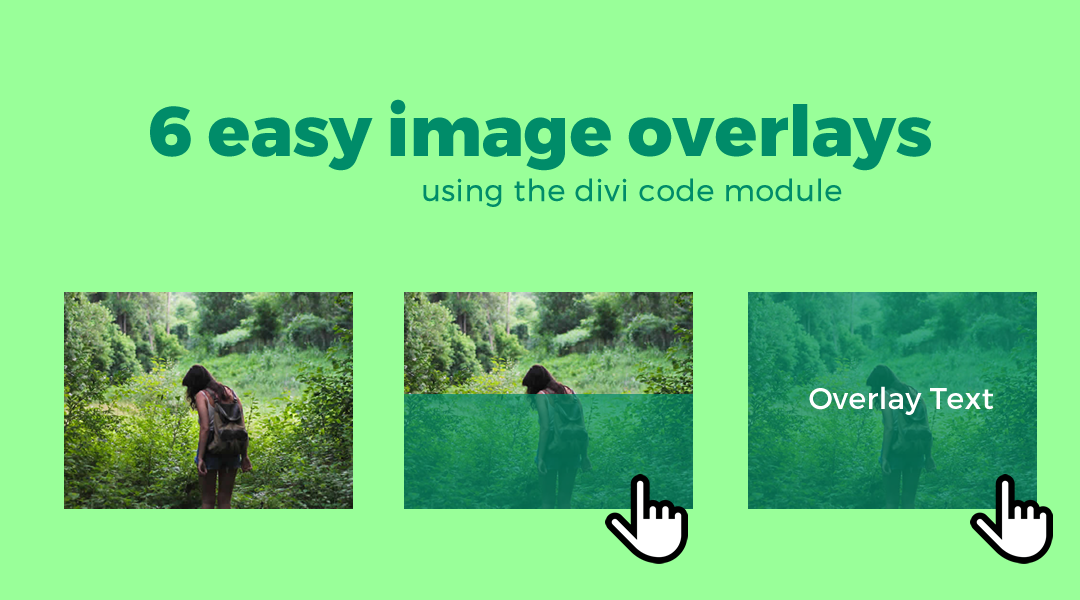
So based on a demo I found on the ever-resourceful w3schools.com website, I was able to utilize the Divi Code Module to create 6 very easy to implement, image overlay styles.
In this tutorial I will show you how we use a little custom HTML and CSS to create a super simple image overlay.
Let’s Get Started Setting up the Divi Code Modules.
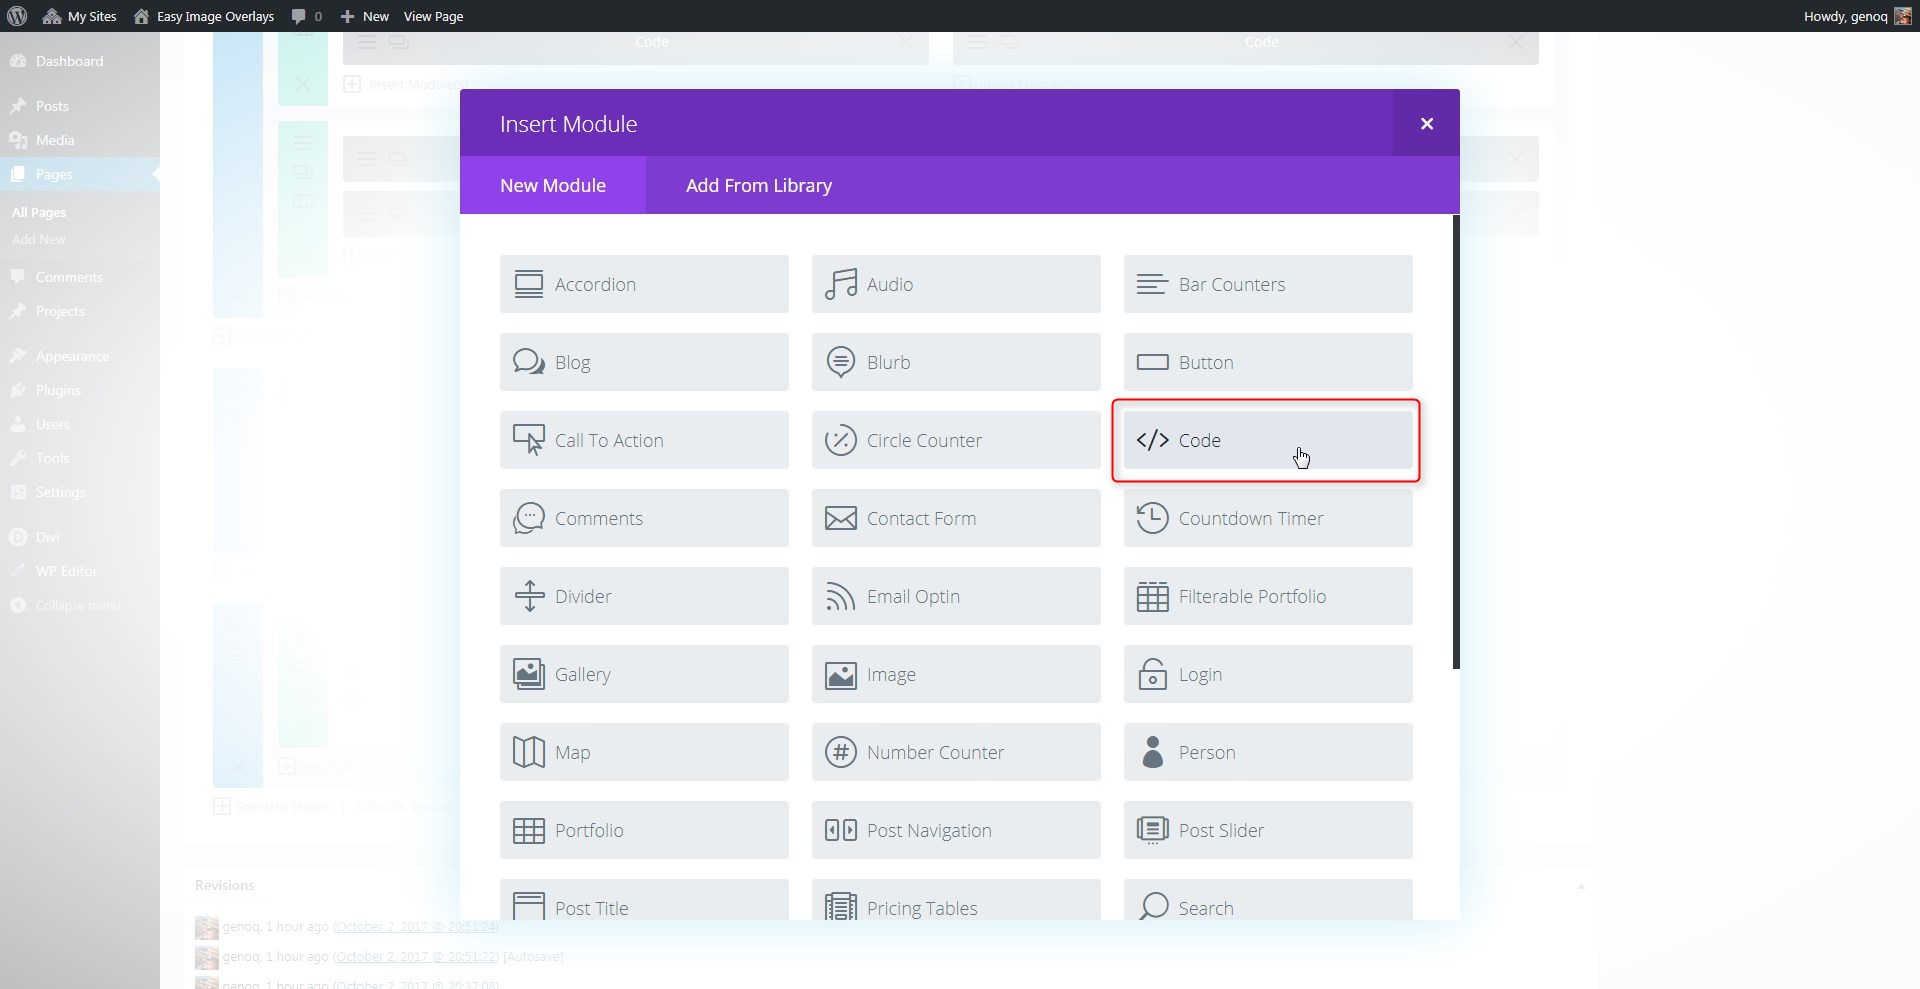
Adding The Code Modules
1. Create a row and give it 2 columns (or however many you want).

2. Add a Divi Code Module to the first column.
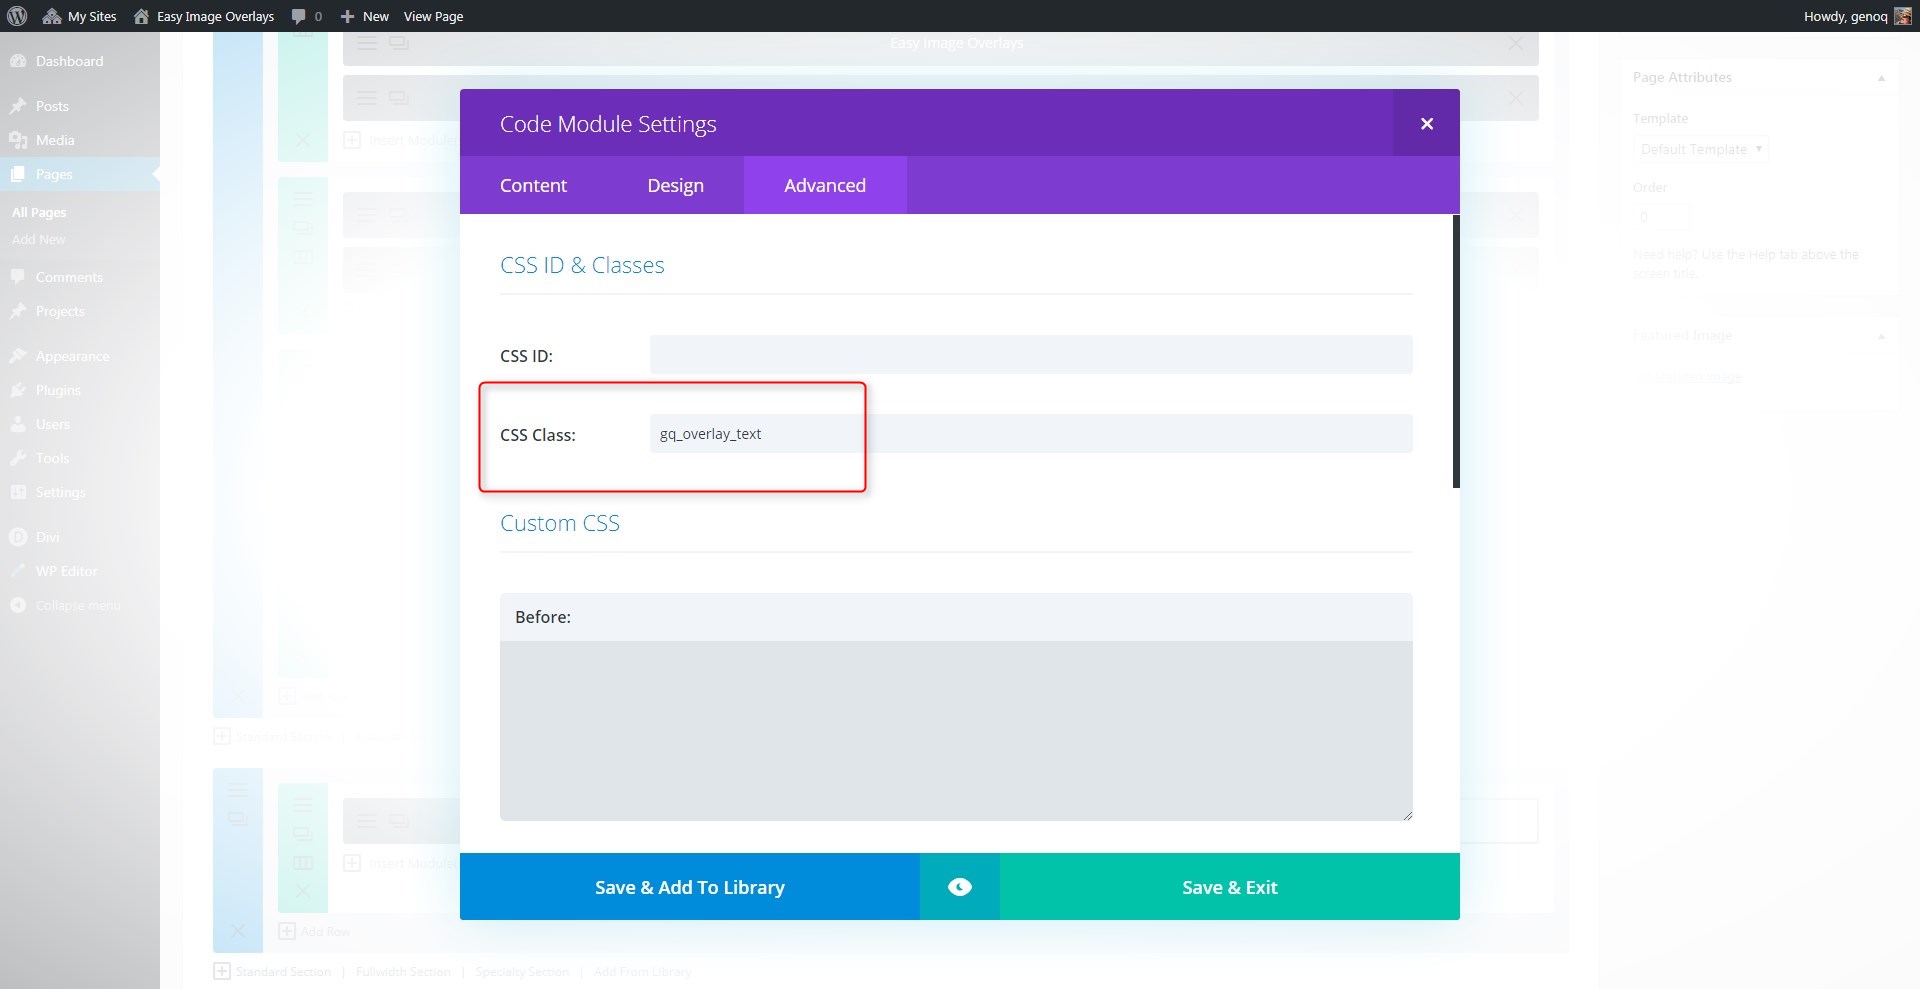
3. In the Advanced Tab: assign the module the following CSS Class: gq_overlay_text
4. In the Content Tab: add the following HTML.

<div class="custom_overlay">
 <img src="https://montereydev.com/demos/divi/easy-image-overlays/wp-content/uploads/sites/12/2017/10/600x450-018.jpg" alt="Image" class="image">
	 <a href="https://quiroz.co/">

<div class="overlay">

<div class="text">Explore The Wonder</div>

		 </div>

	 </a>
</div>
5. Now go to your media library and select the image you want to use. When you click on the image, it will open up a screen with the image url. Copy that url.

6. Going back to your code module, you can update the following pieces with your own image url, link url, and text in the following locations:
Highlighted in Yellow: Your Image URL from the media library
Highlighted in Green: Your Link URL
Highlighted in Blue: Your Text Displayed on Hover

7. Save your page and move on to the magic of adding a little CSS.
Adding The Custom CSS
If you are working with a child theme you can go to Appearance>Editor and open your stylesheet. If not, go to Appearance>Divi Theme Options>Custom CSS (which is located at the bottom of the first tab in Theme Options)
Add this CSS.
/*------------------------------------------------*/
/*---------[ GQ CUSTOM IMAGE OVERLAYS ]-----------*/
/*------------------------------------------------*/
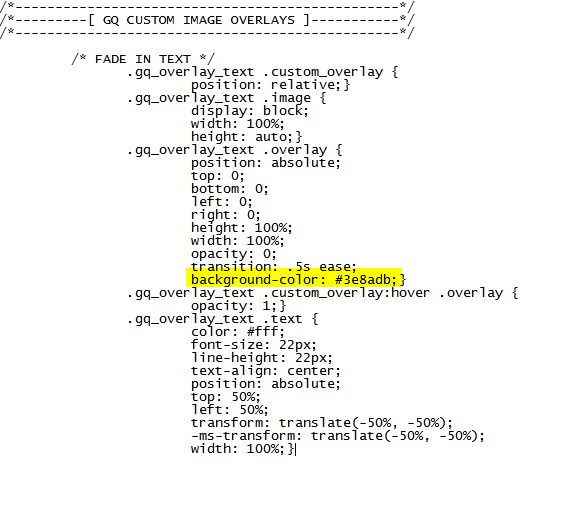
/* FADE IN TEXT */
.gq_overlay_text .custom_overlay {
position: relative;}
.gq_overlay_text .image {
display: block;
width: 100%;
height: auto;}
.gq_overlay_text .overlay {
position: absolute;
top: 0;
bottom: 0;
left: 0;
right: 0;
height: 100%;
width: 100%;
opacity: 0;
transition: .5s ease;
background-color: #3e8adb;
overflow: hidden;}
.gq_overlay_text .custom_overlay:hover .overlay {
opacity: 1;}
.gq_overlay_text .text {
color: #fff;
font-size: 22px;
line-height: 22px;
text-align: center;
position: absolute;
top: 50%;
left: 50%;
transform: translate(-50%, -50%);
-ms-transform: translate(-50%, -50%);
width: 100%;}
Making Adjustments
As with all my tutorials, my goal is not to teach you how to use Divi Settings as much as it is to teach you how to customize your website learning a little CSS along the way. So with that being said, here are a few CSS tips to help you learn a little more about CSS.
To change the overlay background color, you can do so here:
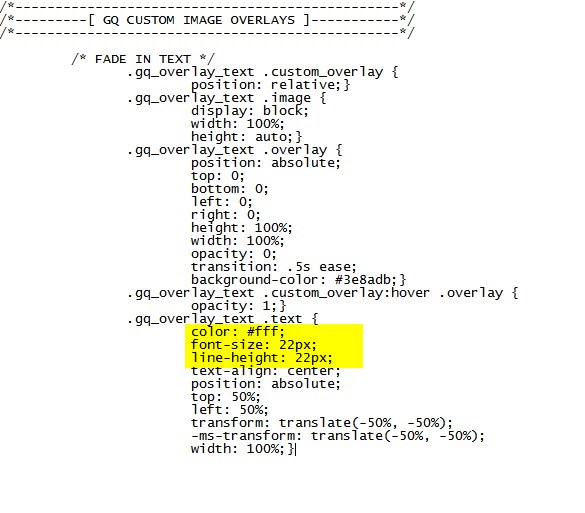
To change the text color and font size, you can do so here:
Everything else pretty much stays the same and should not be modified.
Six Overlays to Choose From
In this tutorial we have 6 different overlay styles to choose from. For the first example we used the Fade-In-Text technique. If you want to use one of the other techniques, just change the CSS Class in the Advanced Tab of the Code Module.
I have written the CSS so that you can use all 6 techniques in a single project with the code conflicting. Below are the CSS Class names and the entire CSS elements for all 6 of them.
Fade in text: gq_overlay_text
Fade in button: gq_overlay_button
Slide in from the top: gq_overlay_slide_top
Slide in from the bottom: gq_overlay_slide_bottom
Slide in from the right: gq_overlay_slide_right
Slide in from the left: gq_overlay_slide_left
/*------------------------------------------------*/
/*---------[ GQ CUSTOM IMAGE OVERLAYS ]-----------*/
/*------------------------------------------------*/

	 /* FADE IN TEXT */
		.gq_overlay_text .custom_overlay {
			position: relative;}
		.gq_overlay_text .image {
			display: block;
			width: 100%;
			height: auto;}
		.gq_overlay_text .overlay {
			position: absolute;
			top: 0;
			bottom: 0;
			left: 0;
			right: 0;
			height: 100%;
			width: 100%;
			opacity: 0;
			transition: .5s ease;
			background-color: #3e8adb;}
		.gq_overlay_text .custom_overlay:hover .overlay {
			opacity: 1;}
		.gq_overlay_text .text {
			color: #fff;
			font-size: 22px;
			line-height: 22px;
			text-align: center;
			position: absolute;
			top: 50%;
			left: 50%;
			transform: translate(-50%, -50%);
			-ms-transform: translate(-50%, -50%);
			width: 100%;}

	/* FADE IN BUTTON */
		.gq_overlay_button .custom_overlay {
			position: relative;}
		.gq_overlay_button .image {
			display: block;
			width: 100%;
			height: auto;}
		.gq_overlay_button .overlay {
			position: absolute;
			top: 0;
			bottom: 0;
			left: 0;
			right: 0;
			height: 100%;
			width: 100%;
			opacity: 0;
			transition: .5s ease;
			background-color: rgba(2, 2, 2, 0.7);}
		.gq_overlay_button .custom_overlay:hover .overlay {
			opacity: 1;}
		.gq_overlay_button .text {
			color: #fff;
			background: #3e8adb;
			padding: 10px 5px;
			font-size: 15px;
			line-height: 16px;
			text-align: center;
			position: absolute;
			top: 50%;
			left: 50%;
			transform: translate(-50%, -50%);
			-ms-transform: translate(-50%, -50%);}

	 /* SLIDE IN TOP */
		.gq_overlay_slide_top .custom_overlay {
			position: relative;}
		.gq_overlay_slide_top .image {
			display: block;
			width: 100%;
			height: auto;}
		.gq_overlay_slide_top .overlay {
			position: absolute;
			bottom: 100%;
			left: 0;
			right: 0;
			background-color: #008CBA;
			overflow: hidden;
			width: 100%;
			height:0;
			transition: .5s ease;}
		.gq_overlay_slide_top .custom_overlay:hover .overlay {
			bottom: 0;
			height: 100%;}
		.gq_overlay_slide_top .text {
			color: #fff;
			font-size: 22px;
			line-height: 22px;
			text-align: center;
			position: absolute;
			top: 50%;
			left: 50%;
			transform: translate(-50%, -50%);
			-ms-transform: translate(-50%, -50%);}

	 /* SLIDE IN BOTTOM */
		.gq_overlay_slide_bottom .custom_overlay {
			position: relative;}
		.gq_overlay_slide_bottom .image {
			display: block;
			width: 100%;
			height: auto;}
		.gq_overlay_slide_bottom .overlay {
			position: absolute;
			bottom: 0;
			left: 0;
			right: 0;
			background-color: #008CBA;
			overflow: hidden;
			width: 100%;
			height: 0;
			transition: .5s ease;}
		.gq_overlay_slide_bottom .custom_overlay:hover .overlay {
			height: 100%;}
		.gq_overlay_slide_bottom .text {
			color: #fff;
			font-size: 22px;
			line-height: 22px;
			text-align: center;
			position: absolute;
			top: 50%;
			left: 50%;
			transform: translate(-50%, -50%);
			-ms-transform: translate(-50%, -50%);}

	 /* SLIDE IN RIGHT */
		.gq_overlay_slide_right .custom_overlay {
			position: relative;}
		.gq_overlay_slide_right .image {
			display: block;
			width: 100%;
			height: auto;}
		.gq_overlay_slide_right .overlay {
			position: absolute;
			bottom: 0;
			left: 100%;
			right: 0;
			background-color: #008CBA;
			overflow: hidden;
			width: 0;
			height: 100%;
			transition: .5s ease;}
		.gq_overlay_slide_right .custom_overlay:hover .overlay {
			width: 100%;
			left: 0;}
		.gq_overlay_slide_right .text {
			white-space: nowrap;
			color: white;
			font-size: 20px;
			position: absolute;
			overflow: hidden;
			top: 50%;
			left: 50%;
			transform: translate(-50%, -50%);
			-ms-transform: translate(-50%, -50%);}

 	/* SLIDE IN LEFT */
		.gq_overlay_slide_left .custom_overlay {
			position: relative;}
		.gq_overlay_slide_left .image {
			display: block;
			width: 100%;
			height: auto;}
		.gq_overlay_slide_left .overlay {
			position: absolute;
			bottom: 0;
			left: 0;
			right: 0;
			background-color: #008CBA;
			overflow: hidden;
			width: 0;
			height: 100%;
			transition: .5s ease;}
		.gq_overlay_slide_left .custom_overlay:hover .overlay {
			width: 100%;}
		.gq_overlay_slide_left .text {
			white-space: nowrap;
			color: white;
			font-size: 20px;
			position: absolute;
			overflow: hidden;
			top: 50%;
			left: 50%;
			transform: translate(-50%, -50%);
			-ms-transform: translate(-50%, -50%);}
And that’s it.
If you used this on one of your projects, please share a link below so we can see how you used it.
Have fun!
Well, that’s all for now. I hope you find this article useful.
![]()


Very clear explanation, great structure and useful tutorial – thank you Geno. it’s always a pleasure when something new from you turns up in my inbox.
Awesome. Thanks for sharing the feedback. I really appreciate it 🙂
Great as always. If we want that the image has some text on it also?Before the hover. Mobile users won’t understand what is about until they click on it…
Great suggestion. I will write up a second tutorial for that. 🙂
Many thanks for this Geno, I’ll certainly use this on a future project. Brilliant!
Awesome. Thanks Alan.
Hi Geno Quiroz,
Thanks for this great article, it really amazing.
Can you think about this style, please see image here: https://www.awesomescreenshot.com/image/2861260/6b98c8ad2f31a0a8229645a6a5150bfc
Here is live Link:http://www.glidewellco.com/
What i do
Use background image for Text Module and Put Frame image in Text Area.
I guess you can do in betterway with custom css or html.
Please share your thoughts.
Thanks Aqeel. I will add this to my list of inspiration for my next one. I will see what I can come up with.
You guys have been such a blessing in the divi community,
Thanks Jude. It a real pleasure working with this community.
I wanted to use the “slide in from top/bot”, but I was wondering if it’s possible to add a description on the right side? and maybe some links?
Great! Is it possible to have the text overlay BEFORE hover and to see the Image AFTER the hover?
Yes you just have to reverse the css a little.
Is there an “easy” way to reverse it so that the overlay/text are there to begin with, but the overlay slides out when you hover revealing the full strength image?
Nevermind. A little trial and error and I figured it out. Thanks for this great feature.
Great tutorial thank you!
Is there a way to add a second line of text in a smaller font?
Yes just add one more line of html under
add this just underneath
then add this css
.gq_overlay_text .text2 {
            color: #fff;
            font-size: 14px;
            line-height: 14px;
            text-align: center;
            position: absolute;
            top: 50%;
            left: 50%;
            transform: translate(-50%, -50%);
            -ms-transform: translate(-50%, -50%);
            width: 100%;}
Then just adjust the top padding a bit so that it sits under first line.
Thanks Michael.
Thank you so much for this Great tutorial! Just want to ask how can I apply those hover effects in WooCommerce product item? I’m totally noob with WP and rely heavily in DIVI.
I am sure it can but I have not tried it yet. I will keep it in mind for a future tut.
Hey Geno, very awesome tutorial and just what I designed for my client in the visual layout (I’m always doing that — designing something awesome looking and then struggling to implement in development later!).
I’m a bit confused by the positioning of the overlay on the images. I had to fiddle with some percentages in your original code that ended up giving the right layout in Chrome, but then looks like #$&* in Safari (my OSX Safari looks fine too, but not sure about any Android browser). Check out the four “pseudo-blurbs” (as I call them) on my client’s site: allprowaterflow.jamestomeconsulting.com. I guess I am confused about this section of your CSS (this was altered to fit my needs — perhaps you have a better way to do this:
.gq_overlay_text .text {
text-align: center;
position: absolute;
top: 46%;
left: 46%;
transform: translate(-50%, -50%);
-ms-transform: translate(-50%, -50%);
width: 250px;
height: 250px;
padding: 30px 10px 10px 10px;
border: 2px solid #ffffff;
margin: 10px;
box-shadow: 0px 0px 3px 1px rgba(0,0,0,0.8);;
}
Thanks for the help!
Jim
Hey Jim,
Yes each use requires custom padding and margins depending on the image, video and theme settings. You can call out specific browser css if you need it to be different on different browsers. https://www.wired.com/2010/02/browser-specific_css_hacks/
Hi Geno,
Very helpful tutorial, will this work if you want the overlay to appear in the Divi module?
If you are referring to the image module, I am not sure yet. I have not tested it using that module.
Hey Geno,
thanks for the fantastic tutorial.
I used that for a client website and in firefox it works very well. But if i open the site with Safari, i can see the text overlay but not the transparent area between the background image and the text overlay. Do you have any idea to fix it?
Thanks a lot and have a nice day
Lucas
Geno, this is wonderful! I have everything set up on my page and then I realized that the text overlay doesn’t return to the image, it flips over to the home page link. Can you please help meso that it stays in place and simply returns to the image? I’m using this to create flash cards. Thank you for your help!
Never mind….I figured it out! Sorry about that.
Hello Geno,
Thanks for this great tutorial.
Would you mind helping me out with one little detail?
How do I adapt the CSS so that the type is 100% opacitiy and the color overlay only 50% opacity?
Thank you,
Barbara
I just shared the solution on another comment for the same request. Great question. I will probably update the tutorial.
Hi, This was an amazing tutorial, looked everywhere for this effect. Just one thing, How do I change the opacity of the blue block? Say to 50%? I know nothing of coding, that’s why turned to Divi. Thanks.
Thank you. I have had several requests for that. I just answered in another comment.
Hi Geno,
Is there an easy way to adjust the opacity of the text independently from the opacity of the background? I would like to be able to see the image through the background, but have the text be fully opaque. Thanks!
Max
I just shared the solution in another comment.
I’ve been looking for a simple image/text overlay feature forever for my portfolio website. This worked great for me in Chrome and Safari with 4:3 aspect ratio image thumbnails and row modules pushed out to full width. Thank you!!!!
Hello Geno,
Thanks for the helpful tut.
I am using only your first effect, “fade in text”, however I want the “overlay background color” to be opaque, without compromising on the opacity of the overlay text.
I have managed to drop the opacity of the “overlay background color” but then the text is also affected and gets equally opaque.
Any help would be appreciated.
Thank you!
Josh
Hello Geno,
Thanks for the helpful tut!
I am only using the “fade in text” overlay, however, I would like the “overlay background color” to be opaque so that the image is still visible. I have managed to get this right, but at the expense of the text going equally opaque.
Could you please help me to use the fade in text overlay with the overlay background color opaque, but not the overlay text.
Thanks!
Josh
All you have to do is change the background color in this section.
.gq_overlay_text .overlay { position: absolute; top: 0; bottom: 0; left: 0; right: 0; height: 100%; width: 100%; opacity: 0; transition: .5s ease; background-color: #3e8adb70;}Hi Geno,
Thanks for this great tutorial. Nice, simple, elegant.
Since this uses the Code Module, I don’t get to use any of the image tools.
For instance, I have 3 photos in a row, and each overlay button would link to a specific gallery.
I want to put a drop shadow under the photo that’s displayed in each column.
But I can only add a drop shadow to the whole row, not to each image.
Is there a way to add that drop shadow through css?
Or would this whole operation be better done through the image module instead?
…ian
Hey Geno,
Thanks for this tutorial. Very helpful.
Since this uses the Code Module, some of the functionality that I’d like to use from the Image Module are not available.
For instance, I’d like to put a drop shadow underneath each of the 3 photos I’m using.
From what I can see, I can add a shadow to the ROW, but not to each individual image.
Is there some easy way to make this work?
You could add something like this…
.et_pb_module.gq_overlay_text { box-shadow: 0px 77px 77px -30px rgba(109, 109, 110, 0.7)!important; }Great tutorial – What about adding a second button?
Thanks. That would be a little tricker.
How about the reverse? I would like the overlay text first then have it fade away on the mouse over? thanks!
Just swap out the opacity values between these two.
.gq_overlay_text .overlay { position: absolute; top: 0; bottom: 0; left: 0; right: 0; height: 100%; width: 100%; opacity: 0; transition: .5s ease; background-color: #3e8adb;} .gq_overlay_text .custom_overlay:hover .overlay { opacity: 1;}One challenge, this works GREAT but when I do the hover I’m getting a slider at the bottom of the image with the overlay. Any ideas? I’m stumped. See: http://ccdev2.career-confidence.org/, under the initial image are 4 images, these have the overlays on them.
Thanks!
Add this property to this existing selector.
.gq_overlay_text .overlay { overflow: hidden;}great tutorial. exactly what I needed, thanks. Is there a way to change the font itself? Cheers
Thanks Kazz. Not sure what you mean by change the font? Can you elaborate?
I am getting a hickup… on page load it displays an overlay @ full screen for a few seconds.
Could you help?
I think that is dependant on your server resources or overall website page load time. Not something I can fix with CSS.
I’d like to change the font to Georgia. Thanks
“Georgia” is a premium font that belongs to Microsoft and is not included in Divi. Here is a tutorial on adding premium fonts that are not included with Divi or free on Google fonts. https://premium.wpmudev.org/blog/custom-fonts-css/
very very easy and so professional
i just have small thing want ask about it i made 6 image and i want each one to have different hover colour how i do that
thns so much
Add an additional class to each code module module and then remove the background color from this CSS
        .gq_overlay_text .overlay {
            position: absolute;
            top: 0;
            bottom: 0;
            left: 0;
            right: 0;
            height: 100%;
            width: 100%;
            opacity: 0;
            transition: .5s ease;
            background-color: #3e8adb;
            overflow: hidden;}
And add this
.gq_overlay_text .color1 .overlay { background-color: #3e8adb;} .gq_overlay_text .color2 .overlay { background-color: #3e8adb;}Thank you for a great tutorial. So clear and precise.
I’ve added a text overlay with a button, which all appears on hover. It’s fine on a desktop but on mobile if the image is clicked it goes straight to the linked page. I don’t want this. I want the link to activate only when the button is clicked. Where do I add the link (and/or change the CSS) to make it so the button only is the link, not the whole image?
Any help would be so greatly appreciated.
You can try removing the hover overlay on mobile and just have the button appear without having to click.
Hey Geno
LOVE the stuff you share
Question; Is there a way to change the font of the text that appears when you hover? Or is that something that i have to change in the divi theme customisation..
You could add a font family to the css.
.gq_overlay_text .text {
font-family: "Open Sans",Arial,sans-serif;}
And swap out the font with you font of choice. It will need to be a font that is already included in Divi.
Hi Geno,
Thanks for this wonderful tutorial.
i have one clarification , i have created and choose the layout 3, but its seems collapsed ,so Question is : How to add 3 column with single row ?
Hi Riyas, I am not sure what you mean. This should work in any number of columns within a row.
Hello – Love easy image overlays – that said, just updated to Divi 4.0.7 and it’s not functioning. Had to step back to the version before this. In 4.0.7 the overlays aren’t triggered, nothing works – the image itself disappears. Here it is not working with 4.0.7: http://tdkca.quantumthink.info/success-stories/ and here it is working with 3.29.3: https://tdkca.com/success-stories/
Awesome. Glad you like it. I plan on doing more. The demo is currently running on version 4.1 and it works fine. I noticed a unique class on the link you sent me. Do you have this class added to the code module? et_multi_view_swapped. Not sure what this selector is doing but it may be the culprit.
Hello there! How would I go about making the text appear slightly before the over? I have attached a link to the example of what I am trying to do. https://www.mstrategicpartners.com/#team
Hi Sarah,
Try adjusting the opacity in the .gq_overlay_text .overlay rule set. For example replace this
.gq_overlay_text .overlay  {
            position: absolute;
            top: 0;
            bottom: 0;
            left: 0;
            right: 0;
            height: 100%;
            width: 100%;
            opacity: 0;
            transition: .5s ease;
            background-color: #3e8adb;
            overflow: hidden;}
with this
.gq_overlay_text .overlay { position: absolute; top: 0; bottom: 0; left: 0; right: 0; height: 100%; width: 100%; opacity: 0.5; transition: .5s ease; background-color: #3e8adb; overflow: hidden;}Super!
So that the module has rounded edges I have added border-radius to:
.gq_overlay_text .image {
display: block;
width: 100%;
height: auto;
border-radius: 5%;}
.gq_overlay_text .overlay {
position: absolute;
top: 0;
bottom: 0;
left: 0;
right: 0;
height: 100%;
width: 100%;
border-radius: 5%;
opacity: 0;
transition: .5s ease;
background-color: #00a8ec90;
overflow: hidden;}
And its working! But is it alright added?
And finally so that the text always appears? before and after overlay how can we do?
Thanks!
Awesome. Nice work. To keep text visible always, just remove the opacity property all together or change it to 1 as I did below..
.gq_overlay_text .overlay { position: absolute; top: 0; bottom: 0; left: 0; right: 0; height: 100%; width: 100%; opacity: 1; transition: .5s ease; background-color: #3e8adb; overflow: hidden;}Thanks Geno!
About the text I mean always keep the text and that the overlay appears when you hover the mouse alone. If I do what you tell me, the text and overlay always appear. Any ideas to do what I say?
Best!
I see. That would require a different approach. I will add that to my list.
Hi Geno, this is absolut fantastic, thank you so much for your great tips and help.
I have learned much from you. Can I send you the link to the used website later? Because it’s not currently online it’s still in progress.
Kind regards
Joerg
Hey thanks Geno, this is just what I was looking for me one of my websites, the View Live Demo link is dead though
Thanks. Works for overlay images fine also (use et_pb_image class and remove overlay background color)