So the other day a fellow designer asked me about adding new Social Media icons to the footer of Divi. He needed one that did not come pre-packaged with Divi’s font-icons.
Now he had already gone through my post “Adding Social Media Icons in Divi” which is where he made the request. My post covers adding icons that come pre-packed in Divi’s icon-font files but are not easily accessible through the admin panels.
So I was about to forward him to this great article by my friend Dan Mossop: “Adding Custom Icons to Divi” wherein he explains how to add your own image for use as an icon in the blurbs module.
But then i got this email from my fellow designer…
I was thinking about adding the custom icons (images) simply via HTML / php coding but if I do that I will lose cool hover effect. Maybe you know of a way to edit/add icon into their font, or another way to save vector/svg/font format for icons.
My initial response…

Darn. Looks like I am going to have to hand this one off. Because the solution he needed involved incorporating additional icon-fonts that he could manipulate using CSS so that it would have the same effect as the existing social media icon-fonts.
But then while out for a drive a couple of hours later, I started thinking about possible solutions and by the time I got home, I was ready to take on the challenge. 1 hour later, the solution was found and the possibilities of future use now became endless.
So lets start with a quick tutorial on how to add 479 new icon-fonts into your WordPress library.
Font Awesome to the Rescue
Font Awesome gives you over 479 scalable vector icons that can instantly be customized — size, color, drop shadow, and anything that can be done with the power of CSS. You can see for your self here but before you download anything, I am going to show you a quick and easy way to use their icon-fonts without downloading anything.
Add The Font To Your Website
There are several ways to add Font Awesome to your website. But I am going to show you the easiest way.
Start by opening up your header.php file in your child theme. If you don’t have one in there yet, just copy the header.php file from the Divi directory, to your Divi-child directory.
If you don’t have a child theme yet, follow these painless step by step instructions I wrote in an earlier post. How to set up a child theme. I would also keep a separate back-up of this file just in case.
Then simply paste the following code anywhere between <head>…</head> tages of your header.php.
<link href="//maxcdn.bootstrapcdn.com/font-awesome/4.2.0/css/font-awesome.min.css" rel="stylesheet">
That’s It! Now you can start doing some amazing things throughout your entire website. Just check out some of these great examples and how to use the Font Awesome icons.
http://fortawesome.github.io/Font-Awesome/examples/
Now let’s get back to the task at hand…
Add The New Social Media Icon to Your Footer
Next you will have to choose the icon you want to add. Keep in mind you have over 479 (and counting) to choose from. You can check out your options here.
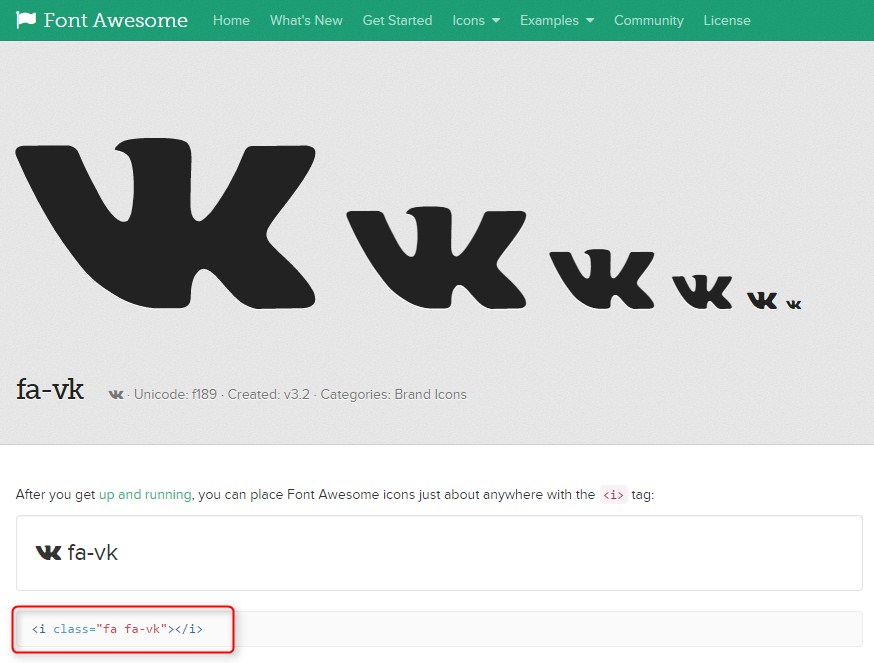
In our example we choose to use the VKontakte icon. VKontakte is the largest Russian social networking service in Europe. So once we find it, click on it and it gives you the code to use like this example here.
Now go ahead and open up your social_icons.php file in your child theme.
If you don’t have one there yet, you will have to make a new directory in your child theme called “includes” (wp-content>themes.Divi>includes). Then you will have to move a copy of the original file from the “includes” directory in the parent theme to the “includes” directory in the child theme.
Then insert the following code just before the closing </ul> tag.
<a target="_blank" href="https://www.linkedin.com/in/genoq">
<span><i class="et-social-icon fa fa-vk"></i></span></a>
The first line includes the url you want the visitor to go to so replace that with your own url.
The second line is the actual icon. You will replace the info between <span>…</span> with whatever code you get from Awesome font just like in the circled section in the image above.
*Just be sure to add et-social-icon before the icon font class as shown below. It will save you time and code.
![]()
Almost done!
Give It Some Style
Now it’s time to make it look like the rest of the icons in that footer. So now go to your style.css located in your child theme and open it up.
If you don’t have one in there yet, just copy the style.css file from the Divi directory to your Divi-child directory.
If you don’t have a child theme yet, follow these painless step by step instructions I wrote in an earlier post. How to set up a child theme. I would also keep a separate back-up of this file just in case.
Now add the following code into your stylesheet.
*Keep in mind the colors used are based on the default Divi color scheme. You can modify the color code as needed.
i.et-social-icon.fa.fa-vk {
font-size: 30px;
text-align: center;
display: inline-block;
position: relative;
transition: color 300ms ease 0s;
color: #666;
text-decoration: none;
padding-left: 20px;
}
So for each new icon you add, you will change the class used in the very first line. In this case it is the .fa.fa-vk that specifies the font Awesome icon we placed in the php file earlier. The rest will remain intact.
And now for the hover.
i.et-social-icon.fa.fa-vk:hover {color: #2EA3F2 !important;}
Same as above, just change out the color with your particular color scheme and the .fa.fa-vk with the specific icon class for each icon.
And this is the end result. Including all the hidden Divi Social Icons.
![]()
You can also view a live demo here: http://montereydev.com/demos/dividemo01/
You can also find more great ways to use the Font Awesome Icons on your Divi Site here. I cant wait to start finding ways to use them on future projects.
Well that’s all for now. I hope you find this article useful.
![]()


Thank you a lot Geno for this tutorial! It solved my problem successfully.
Please kindly comment why does they use tag and maybe continue using list tags inside of should be more correct?
Glad it helped. Although I am not sure why they use the i tags. I will have to explore that a little more.
hi, i have been struggling so with icon fonts, and was trying to follow the elegant themes blog posts for the ‘how to’…with several hours into this, i could not get it to work. i have read this article several times, but was a little intimidated, but , it was so easy, and i am so relieved. thank you so much!! very easy, much easier than downloading fonts and uploading to the server, i just put the line into my tags in my epanel, and away i went, awesome geno!
Awesome. Glad you like it Susan. I think it makes using font icons so much more easier overall throughout the site.
I’m curious if it would be possible to make a plugin that would add Fontawesome to Divi’s built-in font icons? So for example in the blurbs module, you’d have all the Divi icons, plus all the FA icons, as well as in other places where icons are available. I’m no developer, but am just wondering about the possibility.
I am sure it’s possible Tevya. It think that would come in very handy and I would definitely use it. But it would definitely require someone who is much smarter than me haha 😀
Hi Tevya. Have you checked out the new Divi Booster Plug-in just released last week? It allows you to add icons to ET’s set of icons for use in the Blurb Module. It does not import Font Awesome Icons but it allows you to add your own. Check it out here…

I have. I’ll probably purchase it soon.
Hi! I just tried your tutorial with great success when it comes to the footer social icons, but it turned out that it also added the icon to the top social icons, and there it does’t match the size of the others: tairoklinik.dk
Do you know how I could fix this?
Thanks a lot!
Add #footer-bottom to the custom styling so that it only targets the bottom footer. i.e.
#footer-bottom i.et-social-icon.fa.fa-youtube-play {
font-size: 30px;
text-align: center;
display: inline-block;
position: relative;
transition: color 300ms ease 0s;
color: #666;
text-decoration: none;
padding-left: 20px;
}
Also, take a look at your customization’s. You seem to have some extra characters in there – “>
Your site is looking great by the way!
Thanks a lot for the fast reply!! That solved the problem. The icon at the tops seems to be too close to the google+ icon though. Is there a way to fix that? I thought the spacing might be automatic.
What do you mean by “take a look at my customisations”? I’m not sure where I need to look 😛
Hi Anna. Glad it worked. Here is what you can add to adjust the padding to the left of the icon.
#top-header .fa-youtube-play {padding-left: 10px;}As far as the second suggestion, it looks like the extra syntax is gone. Everything looks great now so disregard my comment about looking at your customization. Everything looks great! 😀
Thanks Geno! You’re the best!
Super awesome! Thanks so very much!!
Hi Geno,
Just to let you know that this link is a 404 https://quiroz.co/2014-Demo/
Thanks Catarina. I have been migrating all my demos to a new server and am trying to update all the links today 🙂 Hopefully everything will be much faster 🙂
Thanks for the tut! I’d like to be able to use these icons in a blurb, as previously mentioned. Any thoughts on this? (ideally without buying another plugin and importing them individually)
Hello Andy! It seems like the Divi Booster plugin is still the best method for doing this.
Thanks for sharing your knowledge with this example now I can sleep peacefully
Nice. But how to this using the divi’s social module? I want to add the TripAdvisor icon..
Good question. Something to add to my to-do list 🙂
Hi Geno, Great tutorial. Did you ever get around to making one for the social follow module?
Thanks so much in advance!
Thanks Kate. Not yet.
Hi Geno, It’s possible to add this icons to use in blurbs? To use like the blurbs icons, that we can manipulate size and colours like divi default? Thanks a lot!
I have that on my list of things to explore one of these days 🙂
Hi Geno, I had to create a li with the class before the href to make the CSS take. It may have been a recent update to Divi for all I know, but the instructions as they are didn’t work for me. Thanks for the tutorial, though; it got me way closer than any other resource I found online.
I take that back. I’m not having any success getting it to work; your code doesn’t allow me to target it with CSS for some reason (or I’m completely missing something), and my way doesn’t allow it to be a link.
It been awhile since I used the icons in the Divi Footer. I will take a look and see whats changed.