
In this tutorial, I will show you how to use a little CSS to add borders around an image that extend beyond each other at the corners. I also threw in a little snippet that extends the borders a little more when you hover over the image adding an elegant touch to your website project.
Let’s Get Started Setting Up The Standard Divi Image Module.
1. Start by adding a Divi Image Module to your page.
2. After you have added your image, go to the Advanced tab and add this CSS Class name: gq_m_image_extended_borders

3. Select Save and Exit.
Adding The Custom CSS
If you are working with a child theme you can go to Appearance>Editor and open your stylesheet. Otherwise go to Appearance>Divi Theme Options>Custom CSS (which is located at the bottom of the first tab in Theme Options)
Add this CSS.
/*------------------------------------------------*/
/*------------[ GQ EXTENDED BORDERS ]-------------*/
/*------------------------------------------------*/

		.gq_m_image_extended_borders .et_pb_image_wrap {
			padding: 30px!important;}
		.gq_m_image_extended_borders .et_pb_image_wrap:before {
			top: 20px;
			bottom: 20px;
			right: 10px;
			left: 10px;
			border-top: 1px solid #ccc;
			border-bottom: 1px solid #ccc;
			position: absolute;
			content: '';
			-webkit-transition: all 0.3s ease-in-out;
			-moz-transition: all 0.3s ease-in-out;
			-ms-transition: all 0.3s ease-in-out;
			-o-transition: all 0.3s ease-in-out;
			transition: all 0.3s ease-in-out;}
		.gq_m_image_extended_borders .et_pb_image_wrap:after {
			right: 20px;
			left: 20px;
			top: 10px;
			bottom: 10px;
			border-right: 1px solid #ccc;
			border-left: 1px solid #ccc;
			position: absolute;
			content: '';
			-webkit-transition: all 0.3s ease-in-out;
			-moz-transition: all 0.3s ease-in-out;
			-ms-transition: all 0.3s ease-in-out;
			-o-transition: all 0.3s ease-in-out;
			transition: all 0.3s ease-in-out;}
		.gq_m_image_extended_borders:hover .et_pb_image_wrap:before {
			right: 0px;
			left: 0px;}
		.gq_m_image_extended_borders:hover .et_pb_image_wrap:after {
			top: 0px;
			bottom: 0px;}
Making Adjustments To The CSS
As with all my tutorials, my goal is not to teach you how to use Divi Settings as much as it is to teach you how to customize your website learning a little CSS along the way. So with that being said, here are a few CSS tips to help you learn a little more about CSS.
This snippet is the total padding around the image.It will extend beyond the borders allowing us to cross them at the edges

This snippet assigns the margin from the top, bottom, left and right causing the edges to criss cross

These snippets control just how far the borders are going to extend past each others. The higher the number, the less they extend.
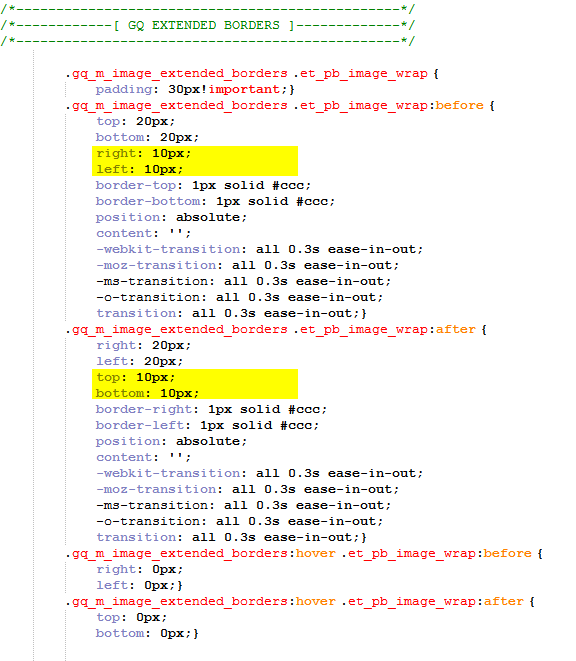
This snippet is the border thickness and color.

And finally, this last piece adds the hover animation making the borders extend just a little more when hovering over the image.

And that’s it.
If you used this on one of your projects, please share a link below so we can see how you used it.
Have fun!
Well, that’s all for now. I hope you find this article useful.
![]()


Hi! Why do you still write prefixes for “transition” property? It’s supported in all major browsers without prefixes.
https://caniuse.com/#search=transition
Hi eugene. Thanks for the update.
Thank you!
You are most welcome.
Nice border Geno. Love what css can do. Talking about css, is there a way to change the black background in the Divi options css panel, into whgite background?
Thanks Dirk. As far as I know, I do not think there is an option to change that yet. It would be a nice option.