
Divi has built in some cool fly-in animations into it’s stylesheet for it’s Image Module. So in the module settings you have the options to have the image fade-in or fly-in from the right, left, top, or bottom.
And on the Divi Nation Quick Tip Episode #10, Nathan Weller gave us a small jquery script to trigger page element animations on both the up and down scroll–whereas by default they would only trigger on the down scroll.
And so here we are going to combine his jquery with the built in css to animate any section, row or module to make a cool animated website that feels alive. You can check out the live demo here.
Lets Get Started
1. First you need to grab this code and copy it to your clipboard
<script>
(function($) {
    var $animation_elements = $('.et-waypoint'),
        $window = $(window);

    function check_if_in_view() {
        var window_height = $window.height(),
            window_top_position = $window.scrollTop(),
            window_bottom_position = (window_top_position + window_height);

        $animation_elements.each(function() {
            var $element = $(this),
                element_height = $element.outerHeight(),
                element_top_position = $element.offset().top,
                element_bottom_position = (element_top_position + element_height);

            //check to see if this element is within viewport
            if ((element_bottom_position >= window_top_position) && (element_top_position <= window_bottom_position)) {
                $element.addClass('et-animated');
                $element.addClass('et_animated');
            } else {
                $element.removeClass('et-animated');
                $element.removeClass('et_animated');
            }
        });
    }

    $window.on('scroll resize', check_if_in_view);
})(jQuery);
</script>
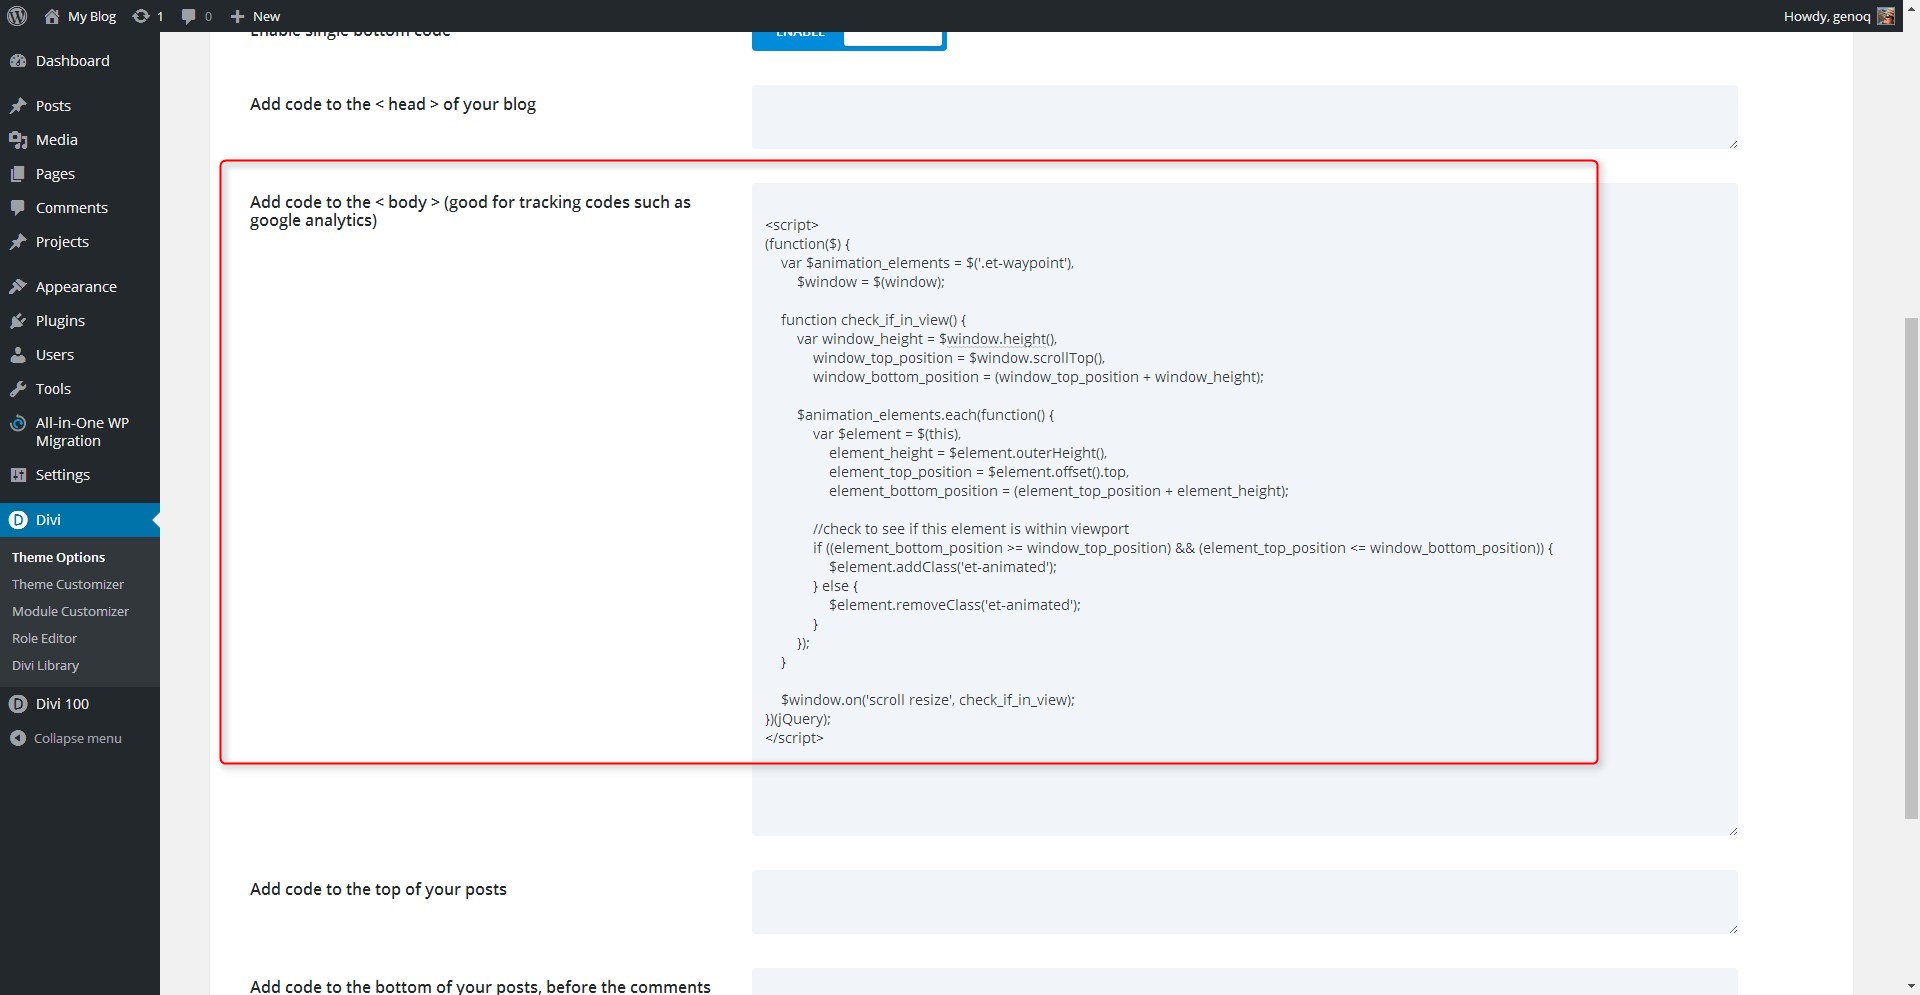
2. Now go to Divi Theme Options > Integration and paste the code into the section that says: Add code to the < body > (good for tracking codes such as google analytics)
Now for adding the CSS Classes
3. Now you can go to your page and start populating the Modules. Below are the CSS Class groups for each animation.
et_pb_animation_top et-animated et-waypoint
et_pb_animation_bottom et-animated et-waypoint
et_pb_animation_right et-animated et-waypoint
et_pb_animation_left et-animated et-waypoint
et_pb_animation_fade_in et-animated et-waypoint
4. Now open up the Module Settings and paste one of the above class groups.

5. Now just go through all your modules and start adding different animations.
Notes
Now I prefer to animate the individual modules but you can animate rows and sections as well. For example on a new landing page I created for Monterey Premier, I created unique sections that look more like binder tabs that stick out from the left. So it made sense to add an animation to those particular sections as if they were flying in from the left.
You can see that page here: Divi Expert Landing Page
And that’s it! Have fun!
Well that’s all for now. I hope you find this article useful.
![]()


This is really cool. Thank you very much.
It is our pleasure! Thanks for visiting!
Hello, The animations are not showing on mobile devices.What can we do now?Thanks for the great article.
By default the Divi animation is removed on mobile devices. You could add it back in but it would take quite a bit of customization to the Divi theme itself.
What kind of tool is it? It’s a framework or something like that? Where can I find more ? Thanks for Sharing!
You can find more information about the Divi WordPress Theme from the Elegant Themes website, here is the link: http://www.elegantthemes.com/gallery/divi/
Thanks for visiting!
I’m asking about the code
Hi Pedro! Sorry about that, I was confused. The code is taking advantage of classes and functions built in to Divi already. The code added to the Divi ePanel is from the Divi Quick Tip #10: https://www.youtube.com/watch?v=bjiVTrXMc3k
Once that is in place you just add the appropriate classes to the section, row, or module that you want to animate.
Is there a way to make this effect ONLY on down scroll?
Yes, you can do that by using modifying the code from the tutorial.
Go to Divi Theme Options > Integration. In the section that says: Add code to the < body > (good for tracking codes such as google analytics), remove the code from the tutorial and paste the following code…
<script> (function($) { var $animation_elements = $('.et-waypoint'), $window = $(window); function check_if_in_view() { var window_height = $window.height(), window_top_position = $window.scrollTop(), window_bottom_position = (window_top_position + window_height); $animation_elements.each(function() { var $element = $(this), element_height = $element.outerHeight(), element_top_position = $element.offset().top, element_bottom_position = (element_top_position + element_height); //check to see if this element is within viewport if (element_top_position <= window_bottom_position) { $element.addClass('et-animated'); } else { $element.removeClass('et-animated'); } }); } $window.on('scroll resize', check_if_in_view); })(jQuery); </script>works like a charm thank you.
How do you get things to delay like he did with the computer on the homepage here: https://montereypremier.com/divi-expert/
Delays can be easily adjusted when you are creating your own animations. In this case Geno is using Elegant Theme’s built in animation so I think the delay is just the natural delay from loading the page.
If you’d like to learn more about animations to create your own, Elegant Themes wrote up an excellent article on that… https://www.elegantthemes.com/blog/tips-tricks/an-introduction-to-css-transitions-animations
You shouldn’t need to include the script tag at all. I wrote a post about this back in April which referenced the two classes (waypoint and the animation you want) and it did work out of the box. There might have been a script change in a recent version though that causes it to need the body code. Worth testing without though is my point.
Nice tutorial though. Always good to see things produced step by step like this. Makes it much easier to digest.
S
Thanks Sean. By default Divi’s animations don’t restart when scrolling back up the page. The script adds that effect to Divi 🙂
Serves me right for skim reading straight to the code I suppose. That’s a really cool little tip then.. nice work. I can see some parallax-effect type sites benefitting heavily from it.
cheers!
S 🙂
Thanks Sean. Cheers 🙂
Is there a way to apply these animations to the header, it would be great to have the menu and logo slide in from opposite directions
Hi Nick! That can be done, but I don’t think you would use this method. It would probably require something more like the CSS provided in the tutorial to swap logos. You can check that out here: https://quiroz.co/swap-horizontal-logo-with-vertical-logo-on-scroll/
So I can’t get it to work. I’m wondering what I’m doing wrong. I pasted the code from the divi tutorial into the body portion of the integration settings on my divi theme options. I checked it mutliple times to make sure I have the complete and correct code but for some reason I cant get the animations to work on both scroll down and up. It is still only down. Is there another setting I should look to that is preventing the code from working? (oh and yes, I do have the body code enabled)
Also, what does he mean by “5. Now just go through all your modules and start adding different animations.” I’m guessing this will be more apparent to me maybe once I get the scroll up animation function to work, but I’m wondering if I’m missing something here? Is there another step after naming the CSS class for each module?
So I found the below post on a separate site and was able to get the animations to work on my modules. http://webulle.com/en/animate-any-divi-module/
Only issue is I would still like to have the ability to have animations load on scroll up and down. Any idea where I’m going wrong? Oh, and thanks so much for this site! It rocks!!!!
Hello Sean! Glad you were able to get the animations to work. The script code from the beginning of the tutorial is what enables the animations to work on scrolling up as well as down. You’ll need to double check that the code is in the correct place in your Theme Options.
Thanx Geno and team Awesome work
What if I want to add Animations from another Custom CSS file. It has the .animated class and different animation names. I made them work, but I can’t seem to be able to make them work based on the et-waypoint. It completely ignores it. I changed in the above code the .et-animated class with the .animated that my custom css has but nothing happened. My Class syntax when declaring them in the divi module is the same as yours.
Any ideas? 🙂
Keep up the great work!
Glad you like our work! One advantage of using Divi’s provided animations is the built in functionality of the established waypoints code. I think to use other animations you also need to add additional jquery and/or javascript. Here is an article that discusses this a bit…not Divi specifically, but the concepts are explained: https://spin.atomicobject.com/2015/05/31/scroll-anmiation-css-waypoints/
Hey, your tuto is amazing, but quick question ? Could this work on mobile too ? because I canno’t make this work beside on my desktop version….
We wish it did work on mobile! Unfortunately Divi’s standard animations are limited to desktop for now. You would need to do some custom coding to get the animations on mobile.
Yes, this is totally useful snippet as many divi modules cannot be animated. Thank you guys for sharing! Awesome work!
Thank you for the tip, I always kept wondering about this but was unable to implement. Your code helped me to achieve this out of the box.
It worked on all the modules without adding any CSS Classes as described in the article.
Am I doing something wrong!
No, you aren’t doing anything wrong. 😉 Adding that script also impacts all of the animations set in the Divi modules. So you can add a class as described in the tutorial, or use the module settings. And then animations will be active when scrolling up, or down.
This is great! Side note: how did you get those tabs created/animated??
Thanks Eric. Which tabs are you referring to?
Nice animations! Thank you very much. Any suggestion to apply transitions between sections? I was trying to apply transitions like pagePiling.js but the truth is that I could not achieve it … Hardly any example/snippet on the subject.
Kind regards!
Thanks David. I dont recall seeing any tutorials on that either. Looks like a fun thing to try one of these days 🙂
Correct me if I’m wrong, but you don’t actually need the et-animated class… as Divi will automatically add this to the element AFTER it has been animated. No need to already have that class added.
I see this is an older post, but hoping someone might be able to help me. I have been having a lot of problems with the fly-in animations. I have six in one section. Sometimes none of them appear, sometimes the only the bottom three appear, sometime only the top three appear, sometimes they only appear faintly. I have other sections with varying amounts of animation that are acting the same way. I am using the child, Bruno. I would appreciate any help offered. Thank you.
Hi Kay. Make sure you you have the latest version of Divi. Also have you checked in with the Child Theme developer to see if he can help? He might have some animation files of his own packaged up in the child theme causing some conflicts.
Hi Geno,
I do have the latest updates of all. I checked with the child theme developers and they said they didn’t understand the issue with boxes. Suggested removing animation class from each module. That just turns if off! It’s affecting every item I have set to animate. I understand it’s hard to figure out when there is no access to site. I just love the effect and so want to utilize it. Thank you for listening. You are wonderful. Kay
Hi Geno–tried this and it was so easy, considering I know no code! Question: I was using this to try and animate a bullet point list by putting each in its own module–except they all come in at the same time (probably because they’re only 1 line each…?). How do i delay each line by a tiny amount?
YOu would have to add a custom class to each one and use custom transition css for each one.
Hi Geno, and Kay and to all,
Well seen all this, excellent, but for Kay this can help:
I found a FREE plug-in which does all this very easily without touching the code, it’s CSS hero ANIMATOR, I’m not talking about the rest CSS Hero that offers the same functionality as DIVI
http://www.csshero.org/animator/
By cons when updating the theme you lose all the animations.
Also I do not know how to integrate this in the child theme CSS file
If someone to the solution, it would be even cooler 😉 because I am a beginner
I wish you happy holidays Christmas and end of year
These animations are not working on mobile device
Divi disables animations on mobile by default for page load purposes
Hello guys thanks for the tutorial 🙂
Is it possible to make the animation works just one time when I scroll down and not each time I scroll down the page?
Try removing the jquery.
Divi elements that already support animation work well. But other elements such as text only animate on page load. I want any element to be able to animate going either up or down.
This tutorial targets everything (sections, rows and modules) and animates going either up and down. That’s what the jQuery is for in this tutorial 🙂
Is there any way to insert this jQuery code in Code Module within the page?
Yes you should be able to. I have not tried but let us know if you.
Thankyou Sir. Succesfully in my blog
Sweet.
This works great–thank you! There’s just one thing beyond my skills at this point. I would like to animate (fade in) ONLY the background image of the section. Right now, the background AND the content fade in on scroll. Is it possible to isolate the effect to only the background image?
Thanks very much,
Dominick
Its doable but it would take a fair amount of custom CSS. I will have to think about the best approach on that one.
Thank you!
DB
My Pleasure
any way to slow down a little bit the animation? when i scroll down, i can just see the last part of the animation
Sure. Check out this additional tutorial I wrote recently. https://quiroz.co/custom-fly-in-animations-with-varying-timing/
Thank You Very much
Hi Geno
I’ve got a page with a single full width section and three slider modules (one above the other).
Each module with a single background image and one sliding text box (two from the left one from the right)
By default DIVI animates it once when loading the page.
I’d like to animate the sliding text on scroll up and down, is there a way to use your script code for this purpose?
Actually I tried to use it, but as you understand, it works on the modules, not on the sliding elements within the modules.
Thanks.
This should work with any of the animations when scrolling up or down the page.
I have been searching for days trying to find the code to have up and down animations as were explained in Episode 14 on Elegant Themes but their link is broken and I can’t find the code to make it work. I tried the code in this post and it seems to be working in some sections but not all. Any help regarding this will be greatly appreciated. All I want is for animations to repeat whether scrolling up or down on all pages. It would be nice to not require adding extra CSS to each element. My site link is below and I’d appreciate your feedback and suggestions. Thanks in advance for your time and consideration!
Bobby C.
Incloud Design
inclouddesign.com
This is working for me.
Hi Geno,
From September 6, the day they launched the new Divi animations (https://www.elegantthemes.com/blog/theme-releases/divi-feature-update-introducing-advanced-animations-options-for-all- divi-modules-rows-and-sections) Nathan’s code no longer works well. You know why?
Percy
We have updated the code so that it works now. They changed a couple of classes.
This is not working correctly for NEW animation classes. I’ve tried everything I can think of to get it to work, and the only thing that does work is to take the CSS code and keyframes for that particular animation, and rename it to something different. Can you please update the code so that it will actually work when trying to call new animation names?
If it only worked now. They took out the et-waypoint. And I have no idea how to trigger the script. 🙁
Adding to my update list 🙂
Hello Geno,
I got the script to work, but is there a way how to change the direction of the animation:
https://wowdesigns.fr/site-vitrine-blog/
Thank you,
Yes Daniel. Check out the section called: Now For Adding The CSS Classes” It gives you various classes to use for direction.