This is #3 in a series of cool sectional dividers inspired by the techniques used on tympanus.net. The tips on tympanus.net are pretty much self explanatory when you dig into the stylesheet but may be a little intimidating to non-css folks.
There are just a few things you have to adjust in Divi. So here is a novice-friendly step by step tutorial for creating transparent triangles between sections in Divi using only CSS.

Lets Get Started
First thing you need to do is assign a unique CSS Class to the section you would like to have the triangle on the bottom of.
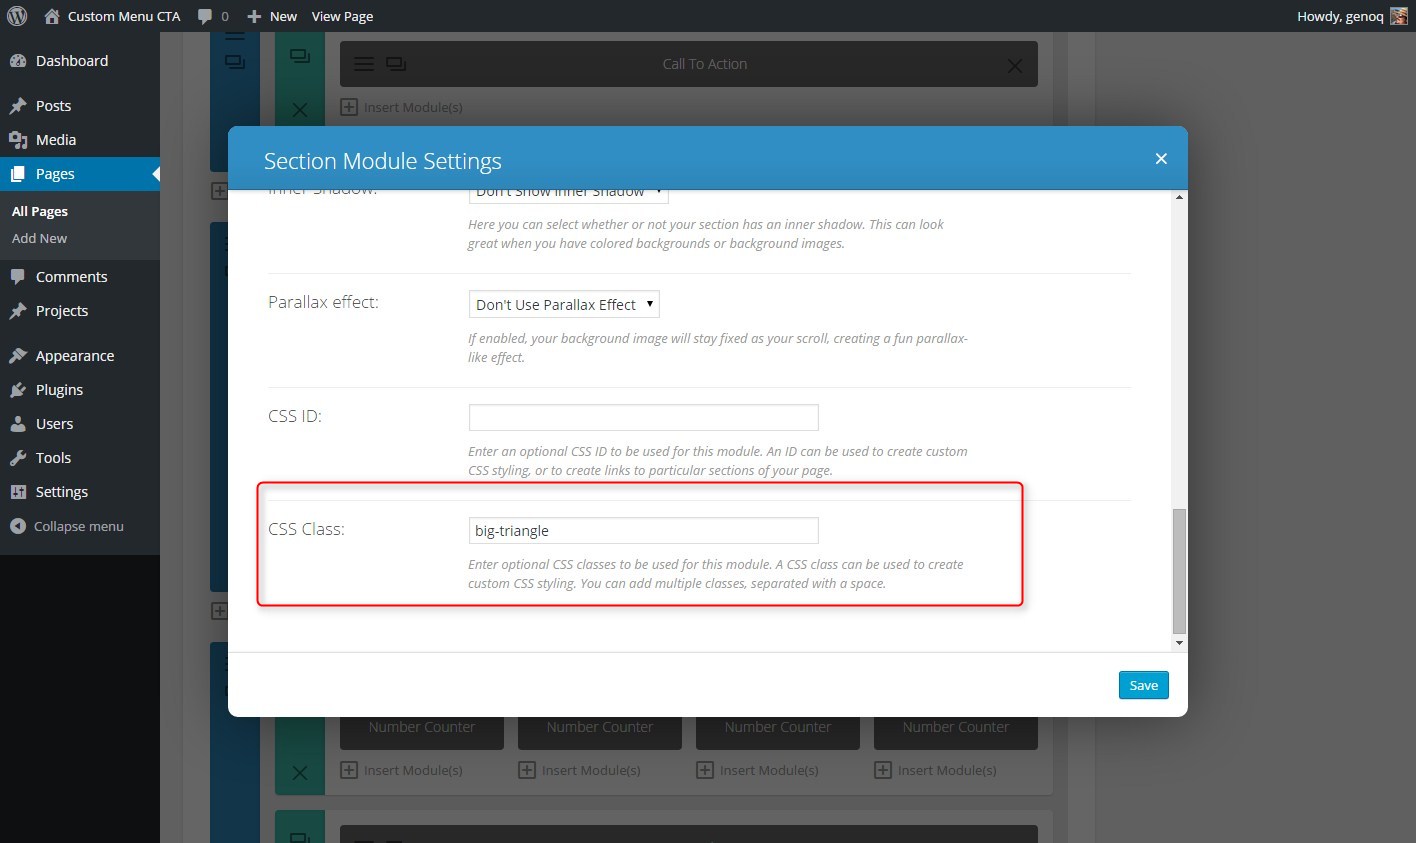
1. Open the section settings
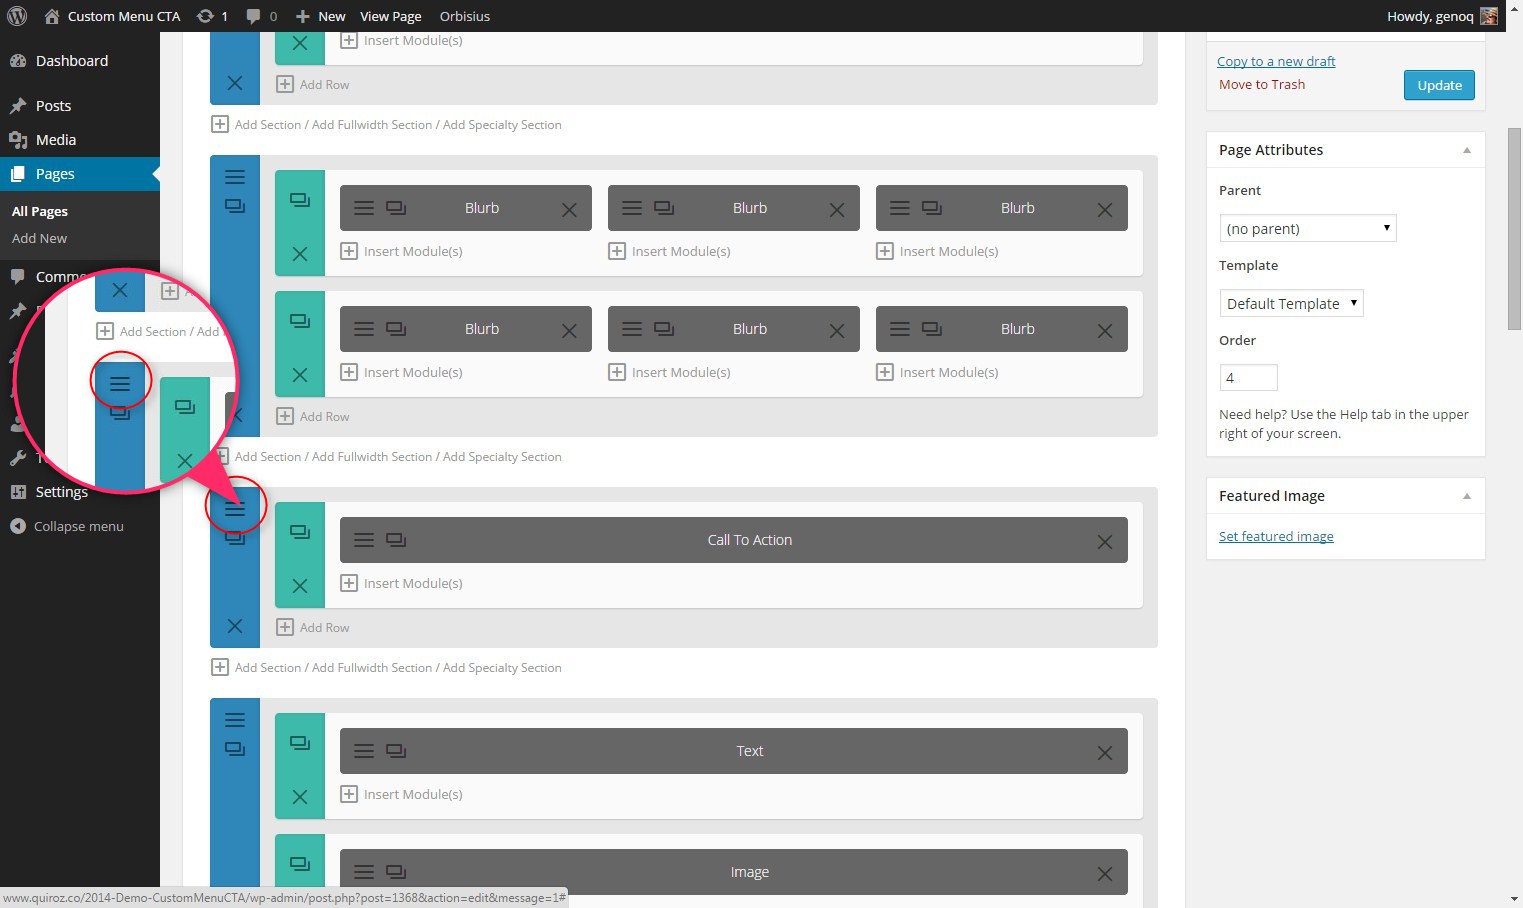
2. Give it the following CSS Class: big-triangle
The Magic of CSS
Now lets start to dazzle things up a bit with some CSS.
If you are working with a child theme you can go to Appearance>Editor and open your stylesheet. If not, go to Appearance>Divi Theme Options>ePanel>Custom CSS (which is located at the bottom of the ePanel)
Add this CSS.
/*------------------------------------------------*/
/*------[Big Invisible Triangle - Quiroz.co]------*/
/*------------------------------------------------*/
#et-main-area { overflow: hidden;} /* Hides all the items that float over the right margin */
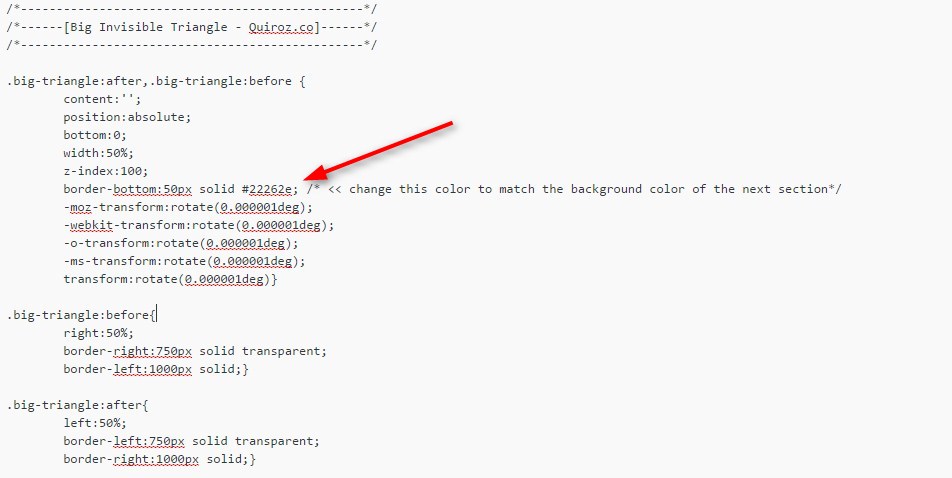
.big-triangle:after,.big-triangle:before {
content:'';
position:absolute;
bottom:0;
width:50%;
z-index:100;
border-bottom:50px solid #22262e;
-moz-transform:rotate(0.000001deg);
-webkit-transform:rotate(0.000001deg);
-o-transform:rotate(0.000001deg);
-ms-transform:rotate(0.000001deg);
transform:rotate(0.000001deg);}
.big-triangle:before{
right:50%;
border-right:1000px solid transparent;
border-left:1000px solid;}
.big-triangle:after{
left:50%;
border-left:1000px solid transparent;
border-right:1000px solid;}
Now suppose you want a smaller triangle like this one.

Well then you can use this instead
/*---------------------------------------------------*/
/*------[Little Invisible Triangle - Quiroz.co]------*/
/*---------------------------------------------------*/

#et-main-area { overflow: hidden;} /* Hides all the items that float over the right margin */

.big-triangle:after,.big-triangle:before {
	content:'';
	position:absolute;
	bottom:0;
	width:50%;
	z-index:100;
	border-bottom:50px solid #22262e;
	-moz-transform:rotate(0.000001deg);
	-webkit-transform:rotate(0.000001deg);
	-o-transform:rotate(0.000001deg);
	-ms-transform:rotate(0.000001deg);
	transform:rotate(0.000001deg);}

.big-triangle:before{
	right:50%;
	border-right:75px solid transparent;
	border-left:1000px solid;}

.big-triangle:after{
	left:50%;
	border-left:75px solid transparent;
	border-right:1000px solid;}
This trick is ideal when the background in the section below is a solid color and not an image. To blend colors just change this piece right here.
On the next tutorial, I will cover how to add a pinched triangle like the one I have just below the number counter on my demo page.
I love providing these tutorials for free but for those of you who use these to your financial gain, might you consider buying this poor guy a coffee? 😉
Well that’s all for now. I hope you find this article useful.
![]()


Thank you for this tutorial! Could you please check out my website..i’ve pasted your code in first section (slider) and what i see is only a coloured line. Website: http://www.ricoh-wg.gr
Hey Leonidas. Thanks for catching this. There was a syntax error in the css above. I updated it now. Copy the revised code above and try again. Let me know.
Everything works like a charm! Thank you very much! You and your blog, are great 🙂
This is awesome Geno! Thanks for the tutorial. Do you have a tutorial on the navigation menu that’s being used on http://montereypremier.com/custom-child-themes/. I would love to use this for a client’s site.
Thanks in advance for all of your help as it is greatly appreciated.
Thanks AJ. Unfortunately I don’t have a tutorial on that just yet. Its in the pipeline though 😀
That’s awesome! Can’t wait to see what you have up your sleeve next. I do have one more question. I’m using the diagonal shadow just above the footer. It works on all of the pages, except the blog. Is there a way to obtain the same effect on the blog page? Here is the link: http://test2.ajcarmicheal.com
I have eyed your work in the past my friend. Nice work. Glad to have you here. I would try this. First find these properties and replace the height as I have it below.
.diagonal-shadow::before, .diagonal-shadow::after {
  top: 0;
  left: -25%;
  z-index: -1;
  width: 150%;
  height: 50px;
  background: inherit;
  -webkit-transform: rotate(-2deg);
  transform: rotate(-2deg);
  -webkit-transform-origin: 0 0;
  transform-origin: 0 0;
}

.diagonal-shadow::before {
  height: 55px;
  background: #000000;
  -webkit-transform: rotate(-3deg);
  transform: rotate(-3deg);
  -webkit-transform-origin: 3% 0;
  transform-origin: 3% 0;
}
and then add this
.diagonal-shadow .et_pb_row {height: 23px;} #main-footer {margin-top: -50px;z-index: +2;position: relative;}These are amazing tutorials!! However I have one problem. I’m trying to use your Ghost Landing page with the big-triangle above on the same page. And I can’t get them to play nicely. The overflow:hidden on the big-triangle instructions makes it so my menu isn’t transparent anymore! Help please! Thanks!
Yes that’s a known conflict. I have not had a chance to play with that yet but if I find a fix, I will notify everyone through the newsletter for sure 🙂
This is a great tutorial! How do you do this with an image, like you have shown in your examples?
Thanks for checking out the tutorials. This is the one I use on the top of the demo with an image in the background. The section below it has to be a solid color. You just use this in the same section that you have the background image in.
Geno, clever css tweaks as always! What happens if you want to use a combination of them on the same page? say a smaller triangle in one section then the larger one below? do you just changing the naming convention in the class? or if you switch to ID will it change both?
Thanks Leisa. Each one works in it’s own individual section and can be used on one page but will conflict with each other if you try to use different ones on the same section. Some are meant to work on the top of a section, some only work on the bottom of a section and some work on top and bottom. It is just a matter of experimenting with them on different sections. 🙂
I really like these posts regarding the section dividers, thanks for interpreting the tympanus.com designs for Divi.
I found however that when implementing this css, the transparent header style from your Ghost Homepage tutorial breaks. DO you know how I might overcome that? I’ve had a tinker already but without success.
Btw, I’m adding the big-triangle class to the same section module to which I assigned the home-landing-section class.
In the section divider tutorials we use this to hide the overflow
#et-main-area{ overflow: hidden;}Unfortunately this is what conflicts with the ghost page header styling. So instead of using the above snippet, you should target the specific section where you are using the separator. For example in the section you are using Transparent triangles, you should also assign it a unique Class ID such as triangles-overflow. Then replace the above code with this…
#triangles-overflow{ overflow: hidden;}Try this and let us know if it resolved your issue. It has worked for me on my other projects.
Geno, that did the trick. I’m very grateful indeed, thank you!
I clearly need to learn more about the overflow property. These practical examples are ideal.
The site I’m working on currently is hidden while being redeveloped, but it was great to employ the ghost homepage approach on http://stellarmass.net
Thanks again,
Ollie
Nice website 🙂
Sorry Geno,
I didn’t see it at first, but the triangle seems to overrun to the right. So the browser scrollbar at the bottom allows a visitor to scroll what looks like around 65% off the page.
Any ideas? I’m working on http://olliehall.net
Double check the Class ID in the section settings. If you have the # in there, remove it. Looking at it from my end shows you named it #triangles-overflow which is incorrect.
That was it. Thank you.
Hello! Thank you very much for your tutorials! They are really helpful, you are an awesome person and extremely skilled! I am learning a lot from you…I have some kind of problem, i used your tutorial and the left line of the triangle i don’t know.. something goes wrong! Can you check it please? My website is : http://www.sbeach.gr Also is there any way to make the triangle bigger? I mean that i want the left and the right lines to go more on top.. (Sorry for my bad english , i can’t explain it) Thank you very much in advance!
Looks like you got his resolved. It looks great!
Looks amazing, perhaps I must have missed something, this is how the last code you gave shows on my website client : http://prntscr.com/76xplg
Any idea why? Thanks Geno… 🙂
You have to change the color of the angled border to match the section below. find this in my custom code…
and change it to this
Hi Geno,
I tried on few of my website, but I never get it to work.
I have no idea why.
I try and use it on full-width slider, that maybe that?
Cheers,
Paolo E.
Did you ever get this resolved Paolo?
Great tutorial! I have been bookmarking these as you share them on the Divi facebook group. 🙂
I was wondering if it’s possible to do this with the bottom section having an image for a background instead of a solid color? Thanks in advance!
Thanks for visiting. Not using this technique but there are other ways to achieve that desired effect. It would require modifying the section above the image instead of the bottom section. I will add this to my list of potential tutorials 🙂
I’ve been playing around with the css. Tried adding it to the top of the section with image (bottom section) too, but I can’t seem to figure it out. Hahaha!
Thanks for your reply. Will be looking forward to your future tutorials. They
re really helpful!
absolute legend thanks for sharing your knowledge
Very nice tutorials, much thanks for them! I’d like to know how to alter the size and form of the triangle, anyone?
Hi Geno,
Thanks for the great tutorials! I was wondering if it was possible with “.big-triangle” to set the overlay to be transparent, and then have it pick up the background image from the section below to populate the triangles instead of a solid color. I am using this between 2 sections with background images.
Thanks!!
Unfortunately not using this method.
It is Possible to create a footer like this http://www.hollycreekhomes.com/ in divi?
Yes you can do so using a modified version of this tutorial. https://quiroz.co/how-to-create-a-triangle-between-sections-in-divi/
Dear Geno,
Thank you so much for the guide provided here.
Can you teach us how you can do an opposite to this tutorial?
The example is this one: https://joinshortlist.com/a/index/im/connector The third section with the words: “Make the cut – Connect with shortlist”
The big triangle is on top and covers the top part of the background image.. thank you so much..
Hey Andrew,
I am also trying to figure this out… My willing is to have this big-triangle between a SOLID WHITE SECTION and a MAP.
A bit below your post, Jerry is explaining how to reverse this class :
“Hi Rebecca! Glad you like the tutorial. You can reverse the effect by changing two lines in the CSS…
#1 – bottom:0;
Change it to – top:0;
#2 – border-bottom:50px solid #22262e;
Change it to – border-top:50px solid #22262e;”
I think that this might be a good start for us… Then we just need to figure out how to reate a triangle to cover you image or my map. I am quite a nooby with CSS so I ll just try to see if I can copy past some code from another tutorial ;).
If anyone want to help… would be much appreciated hehe !
Baps
Hi Geno – this is brilliant. is it possible to change the apex of the triangle to be off centre? I’m a newbie with css and wondered if it’s something I can figure out? Many thanks.
Sure there are a lot of tweaks you can make. Check out what I did with a little modification to this code here. http://montereydev.com/themeshop/thejourney/
Also check out the triangles in this page. Scroll down a bit to the workshops section and you will find offset triangles based on my other tutorial. http://www.kickstartall.com/ These were based of this tutorial. https://quiroz.co/how-to-create-a-triangle-between-sections-in-divi/
This is exactly what I’ve been looking for as well. Thanks so much for all your work Geno.
Awesome. Thanks for the feedback Raquel 🙂
Hi Geno! Thanks so much for this, it really adds an awesome touch to a page. I have a question though… The triangle background is a video, so maybe thats the problem, but it shows a thin line of the header video under the triangle where it should be white. It doesn’t show up on mobile version or smaller laptops, but it does on the macbook pro. Haven’t tried it on any desktop screens – not even sure if screen size is the problem. Have you encountered this before? Any help would be great! Thanks!
I have not tried it with video yet. I will have to give it a try when I get some time
Okay, I look forward to hearing about what you figure out!
Hi Geno! Were you ever able to give the triangle with a video a try? 🙂
Hi Geno! only the right side of the triangle shows up when used on a revolution slider. I have tried playing with the z-index to no avail. any solutions?
No. Unfortunately the CSS is not compatible with the RS code.
Hi Geno,
Love this tutorial, thanks very much! I have a question though, I want to have an upward facing small triangle on top of my footer section. Any clues as how to achieve this?
Good morning Geno, thank you very much for the tutorial.. I have a question.. I implemented this and it looks great.. http://marketmarket.theultimatewebmaster.com/ the white color seems to make the full width photo looks shorter as a result.. I tried adding a padding to the bottom, but it will cover up the triangle instead.. is there a way to increase the background image height without effecting the triangle? Thanks..
The height of the image is based on the content in the section. I think if you add bottom padding to the “row module” it will show more of the image and push the triangle lower the way you want.
Hi Jerry! Alright got it with thanks.. much appreciated..
Hey, love this! How can I reverse the effect so that the triangle points up instead of down?
Hi Rebecca! Glad you like the tutorial. You can reverse the effect by changing two lines in the CSS…
#1 – bottom:0;
Change it to – top:0;
#2 – border-bottom:50px solid #22262e;
Change it to – border-top:50px solid #22262e;
Happy coding! 😉
Is it possible to do this with two sections that have background images?
This effect really works best with solid color backgrounds since the color code is part of the CSS. There are ways to overlap images, this wouldn’t be one of them.
Great Tutorial but I’ve a small problem, I’ve copied the exact code but I get a black section below the sectional dividers and above the start of the section underneath.
http://cre8tivemedia.co.uk/wp-content/uploads/2016/08/Screen-Shot-2016-08-11-at-13.47.52.png
There is one more thing you need to do to address that… change the color code in the CSS to match the gray section that you have below it.
Look for this line in the code from the tutorial…
border-bottom:50px solid #22262e;Change that #22262e to the gray color you are using…looks like it might be #3a3a3a.
That you so much for your tutorials. I am trying to get a transparent triangle after the section but it isn’t working. This is the code I have entered.
/*——————————————–*/
/*——[Triangle Dividers – Quiroz.co]——-*/
/*——————————————–*/
.triangles::before, .triangles::after {position: absolute; content: ”; pointer-events: none;}
.triangles::before, .triangles::after {
left: 50%;
width: 100px;
height: 100px;
-webkit-transform: translateX(-50%) rotate(45deg);
transform: translateX(-50%) rotate(45deg);}
.triangles::after {
bottom: -50px;
z-index: 10;
background-image: linear-gradient(135deg, transparent 50%, black 50%);
}
Hmmm… I don’t think this method can be used with gradients. I’ve tried several ways without success.
Thanks for the response Jerry! Not using it on a gradient. http://tamlyndesign.website/contact/
Hello Simone! I think that you might have mixed up the tutorials a bit. The CSS you are using right now is from a different tutorial, calling for the .triangles class. This tutorial uses the .big-triangle class. The name of the class is not that important, but the code is very different. Based on your link, I think you are want to use this tutorial: https://quiroz.co/how-to-create-transparent-triangles-between-sections-in-divi/. I would suggest you read through it again and then apply it to your page.
I made this by my self, but your code more clear so im apply it to my site. God bless you!
I’m a total newb, and I got this to work. Awsome Geno, fancy trick! By the way, was born and raised in Monterey Bay…I love it over there. Thanks for the code!
Another awesome Tute from Geno! Quick question. How to have an image float over the section with big-triangle CSS without damaging the image. Example here: https://webrenovator.com/example-triangle
I have the image of the mobile phone in a separate section below… with top padding of -610px on the image
Keep up the great work. Thanks. Steve
This snippet calls for hiding any overflow between sections on the whole page. You would have to assign a special class to the section with the triangles and only hide the overflow in that section instead of #et-main-area
Thanks Geno. Awesome!
I’ve used the code and it’s what I want, however the section extends 1000 pixels more than the site limit in home, how do I fix it ?, this is what in the code is: # et-main-area {overflow: hidden;} / * Hides all the items that float over the right margin * / ??
thank you
It looks like you have a space between the # and et-main-area {overflow: hidden;}. There should not be a space. Also you may need to add !important.
#et-main-area {overflow: hidden!important;}Thank you Very Much Geno, you are my code hero!! 😉
My pleasure 😀
Is reversing the direction able to be used on the top of a section? Or does it just change the arrow direction at bottom?
This is creating two white elements before the main section. The element on the left has an angled right edge and the element on the right has an angled left edge giving you the appearance of a triangle.
Alyssa,
I was able to create a top pointing triangle just by changing the word “bottom” to “top in two places. And of course I changed the name and added the css class to the sections I wanted a top triangle on.
Great tutorial Geno! Loved it!
.big-triangle-top:after,.big-triangle-top:before {
content:”;
position:absolute;
top:0;
width:50%;
z-index:100;
border-bottom:50px solid #000000;
-moz-transform:rotate(0.000001deg);
-webkit-transform:rotate(0.000001deg);
-o-transform:rotate(0.000001deg);
-ms-transform:rotate(0.000001deg);
transform:rotate(0.000001deg);}
.big-triangle-top:before{
right:50%;
border-right:1000px solid transparent;
border-left:1000px solid;}
.big-triangle-top:after{
left:50%;
border-left:1000px solid transparent;
border-right:1000px solid;}
Awesome. Thanks for sharing your solution 🙂
Is it possible to create the big triangle divider when there is an image in the section below, the section on top would be a solid color, for instance white, and the botto section would have a background image.
Unfortunately that would require a completely different approach and I dont have that solution prepared. Perhaps it is something I will re-visit in the near future.
Actually, there’s a simple solution for this! Just add the CSS class to the section containing the image, and change a few values as below:
.big-triangle:after,.big-triangle:before {
content:”;
position:absolute;
top:0;
width:50%;
z-index:100;
border-bottom:50px solid transparent;
-moz-transform:rotate(0.000001deg);
-webkit-transform:rotate(0.000001deg);
-o-transform:rotate(0.000001deg);
-ms-transform:rotate(0.000001deg);
transform:rotate(0.000001deg);}
.big-triangle:before{
right:50%;
border-right:75px solid white;
border-left:1000px solid;}
.big-triangle:after{
left:50%;
border-left:75px solid white;
border-right:1000px solid;}
I changed bottom > top, and transposed the color settings (transparent triangle > white, colored border > transparent). This inverts the triangle and moves it to the top of the section, thus creating the triangle at the “bottom” of the section above it…good luck!
Hello, i discovered your videos from France. Great stuff. I might be even too novice for your novice-friendly videos… Where should I paste the code in the stylesheet? I tried to paste it at the very top (line n°1) but it does not work… Would you have a screenshot of where exactly it should be pasted? Thank you so much 🙂
I would recommend pasting it at the very end of your stylesheet.